Importing Equipment into Rack Spaces via DDR
When importing Equipment to be placed into a Rack, the user has to specify all the fields associated with importing Equipment into an Area along with the additional fields used to import Equipment into specific positions within the rack.
This section will review all the options available to importing Equipment objects to build Rack Elevation Layouts:
|
Field Name
|
Description
| ||||||||||||||||||
|
Area
|
The name of the Area within which the Equipment will be placed eg. Building 1 Floor 1
| ||||||||||||||||||
|
Type Name
|
The name of the Equipment Type as defined in the Equipment Type database e.g. Nordx 2 Port Cat6 Faceplate
| ||||||||||||||||||
|
Name
|
The equipment name to help identify the Equipment being imported. e.g. WA0001/A
| ||||||||||||||||||
|
Instance Lifecycle Stage
|
The lifecycle stage to be assigned to the imported Equipment, e.g. 'Deployed'
| ||||||||||||||||||
|
Place By Value
|
The Place By Value is used to identify the Rack Equipment Name into which the Equipment will be installed.
| ||||||||||||||||||
|
Place in Rack X
|
Specifies the horizontal position in the rack space, can usually be left as null. when null the equipment will be auto positioned horizontal by the field Default front/rear horizontal position in rack
| ||||||||||||||||||
|
Place in Rack Y
|
Specifies the vertical position the object will placed in the Rack and can be specified as a Rack Unit or Inch value.
| ||||||||||||||||||
|
Place in Rack Space
|
Specifies within which rack space the object is mounted and must reference one of the following values:
| ||||||||||||||||||
|
Place In RackSpaces Default Unit
|
Specifies if the value in the Rack X column of the CSV file represent Rack Units or Inches.
| ||||||||||||||||||
|
Default front/rear horizontal position in rack
|
Specifies the default position when importing equipment into either the front or rear mounting spaces.
Available options are:
| ||||||||||||||||||
|
Default horizontal position in rail
|
Specifies the default position when importing equipment into any of the side mounting rail spaces of the rack.
Available options are:
|
Worked Example
The following is a worked example describing how to import Equipment into different Rack Spaces to build the following elevation layout: 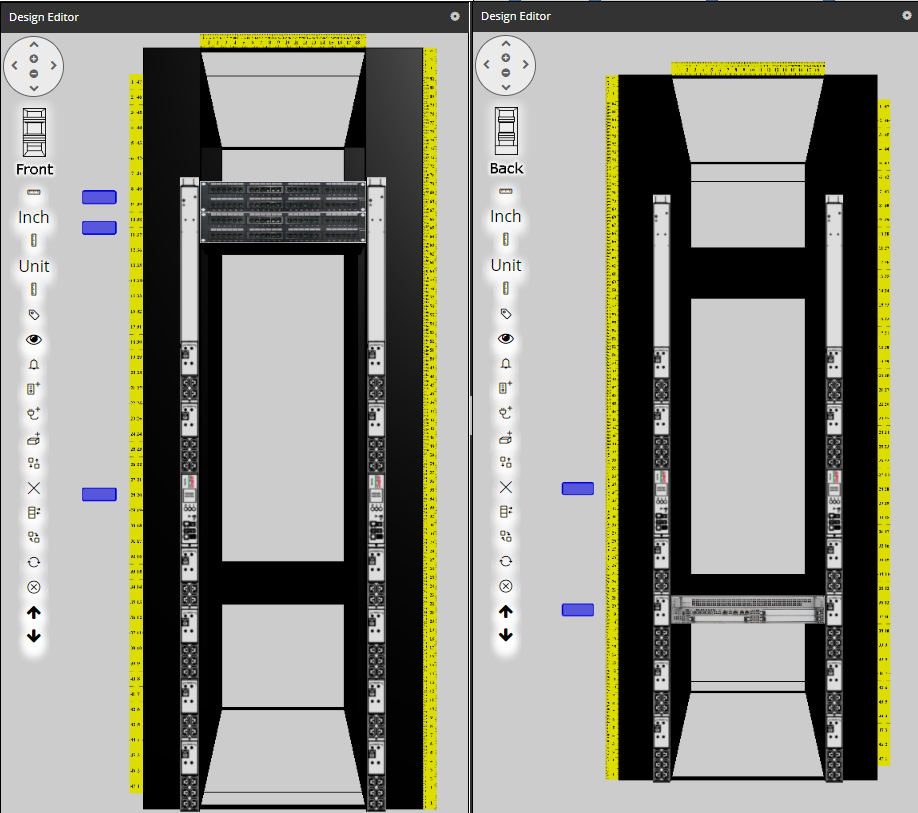
Example CSV File to Import and mount equipment into an existing Rack Equipment:
|
Area
|
Type Name
|
Name
|
Instance Lifecycle Stage
|
Place By Value
|
Rack X
|
Rack Y
|
RackSpace
|
|
Building 1 Floor 1
|
48 Port 2U Patchpanel
|
Rack101.PP.A
|
Deployed
|
Rack101
|
|
40
|
front
|
|
Building 1 Floor 1
|
48 Port 2U Patchpanel
|
Rack101.PP.B
|
Deployed
|
Rack101
|
|
38
|
front
|
|
Building 1 Floor 1
|
48 Port Workgroup Switch
|
Rack101.SW.A
|
Deployed
|
Rack101
|
|
12
|
rear
|
|
Building 1 Floor 1
|
Vertical Powerstrip
|
Rack101.PS.A
|
Deployed
|
Rack101
|
|
|
frrail
|
|
Building 1 Floor 1
|
Vertical Powerstrip
|
Rack101.PS.B
|
Deployed
|
Rack101
|
|
|
flrail
|
|
Building 1 Floor 1
|
Vertical Powerstrip
|
Rack101.PS.C
|
Deployed
|
Rack101
|
|
|
rrrail
|
|
Building 1 Floor 1
|
Vertical Powerstrip
|
Rack101.PS.D
|
Deployed
|
Rack101
|
|
|
rlrail
|
Example: Source Data Placement tab
In this tab we specify how we want to place the Rack Equipment at an existing Rack Equipment, already placed in the Area using Place By Equipment. We also want to place the equipment in the rack spaces by specifying the Place in Rack options as shown:
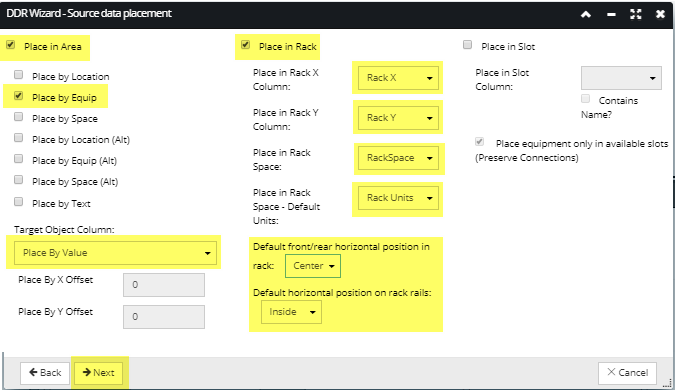
The DDR Import Place In Rack feature uses auto-placement for Equipment for which the requested positioning cannot be performed. Another aspect of this feature is that enables using a few pre-defined special values for the horizontal position in a rack during DDR Import. This means that instead of specifying a number for the Rack X value in a row of the spreadsheet, you can select a special value which can be one of the following values: Left, Center, Right (for front / rear position) or Inside, Center, Outside (for rack rails position). This allows specifying the positioning on a per-row basis.
Note: In this dialog it is also possible to place the targeted Equipment (i.e. cards) into a Slot space, with a caveat that Equipment with "Slot Compatibility" property set to "none" are allowed to be installed into any Equipment Slot. When trying to DDR Import the same Card with Compatibility set to None into the same slot on the Equipment, the DDR result raises a warning. Note that this logic only applies to Equipment Types where Is SubComponent property is set to True and Slot Compatibility set to None.
Example: Column Mapping
This tab is used to map the additional data columns for Area, Type Name, Name and Instance Lifecycle Stage ( all other unmapped columns can be ignored).
Note: When the column name in the CSV matches the column name in the Wizard, the fields will be auto-mapped
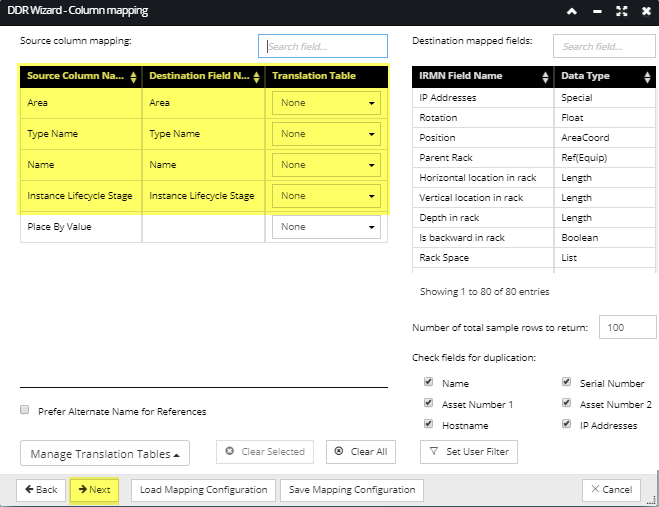
WARNING: Duplication checking can be computationally expensive when large DDR files are imported into a Site with large numbers of Equipment objects (hundreds of thousands or more).
DDR Import Results
After completing the import the Rack Elevation layout will appear as a follows: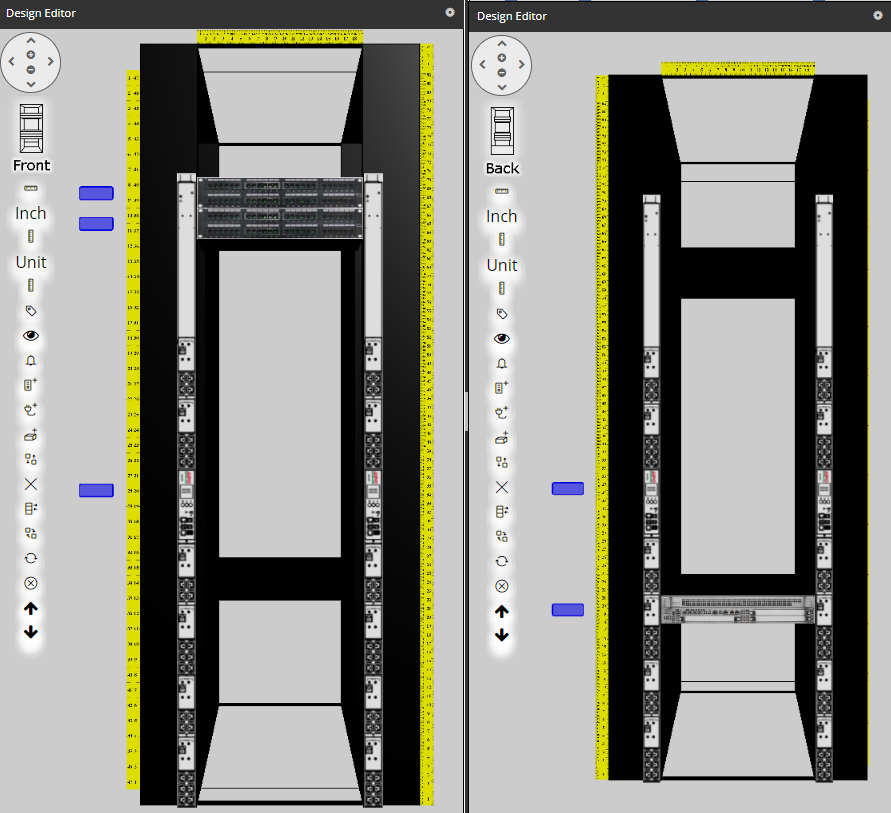
IMPORTANT: In case when the DDR import includes multiple types of placement in a single operation, the critical Equipment characteristics, such as IsRackMountable, IsRailMountable, IsSubcomponent) must be set correctly in order for the code to understand what kind of placement it should be trying to do. If otherwise, the application will return the "PlaceBy object not found" error message.