Before proceeding with the Quick Start Guide we strongly recommend to read section 3 Key Concepts and Terminology first.
The new IRM is a fully web-based product and is provided in two forms:
-
Software-as-a-Service (SaaS) - where the product is hosted on servers maintained by Planet Associates.
-
On-Premises - the product is hosted on customer-controlled servers
IRM installations, whether SaaS or on-premises, need these web servers:
-
Global Console server, which is the starting point for using IRM allowing ordinary IRM users to start up the web client for any of the installation’s Sites and administrators to accomplish various tasks such as creating Sites, adding IRM Users, and setting permissions and Policies.
-
SiteMaster servers are used to manage the installed IT infrastructure. Most customers will likely use a single SiteMaster server whereas larger global enterprises may require a site master for specific regions.
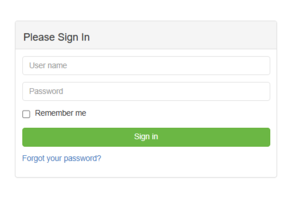
The Global Console presents a login dialog if the user is not already logged in:
Log in with the username and Password provided by your administrator.
Global Console
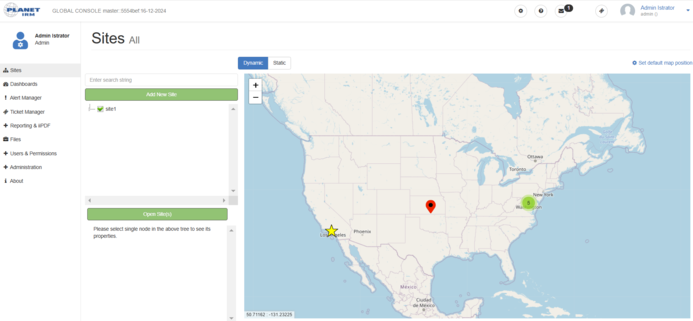
The following screenshot image displays the Global Console page that is displayed after a successful login:
Global Console is the starting point for all IRM operations. It is used for administrative purposes which we are not covering in the Quick Start Guide. It is also used to see certain basic elements of IRM Dashboards, Tickets and Reports.
The Global Console allows easy access to the main component of IRM, the Web Client, which is where the bulk of the work is done within IRM.
For the purposes of the quick start, simply select Site 1 and then click on the Open Site(s) button.
Web Client
The IRM Web Client's Main Screen is the primary view presented when a specific Site is opened or the page is refreshed. It consists of several parts that enable specific features.
Considering that IRM is a full-featured desktop application that runs in the browser and there is a great deal of core data associated with it, the initial load may take several seconds, and it is recommended to wait until the Active and Queue numbers reach zero.
The Webclient mainscreen consists of:
-
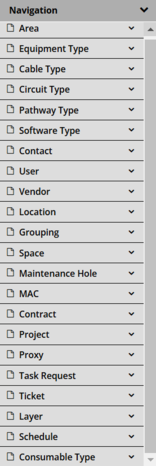
Navigation panel or the Categories and Types tree.
-
-
Categories & Types Panel
The Navigation panel, or commonly called, the Categories and Types tree, contains a set of expandable accordion sections, each corresponding to one of the Super Categories (Equipment, Cable, Location, Circuit, etc.). Each accordion section expands into a tree control when clicked, the contents of which follow a two-level tree structure: Category -> Type or Instance. Importantly, a single type or instance object can be in multiple categories at once, for example a switch type can be in both a manufacturer category (e.g. “DLink”) and a functional category (e.g. “Switches”). As part of the IRM Library, IRM provides a number of predefined Categories within each Super Category.
The user has full control of the Categories defined in the tree and can create, modify, delete or reorganize the tree into a structure that meets their specific operational needs. However, Planet Associates strongly recommends using the default organization of Categories as it is quite comprehensive and powerful while remaining simple.
The C&T panel above is displayed in the fully closed (collapsed) state, with all accordion groups hidden under the group header.
From this state:
-
Individual accordion groups can be opened by clicking on the down arrow icon to the right of the group name.
-
The panel can be fully opened (expanded) by clicking on the down arrow icon to the right of the Navigation label in the C&T header.
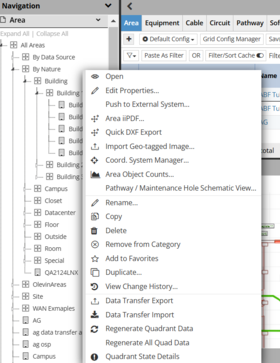
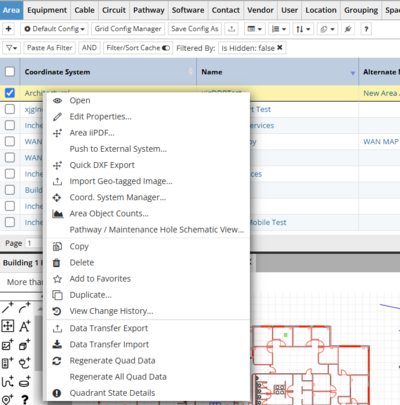
In order to open a specific Area, expand the Area group, right click on the desired Area, and choose Open from the context menu.
Object Grid
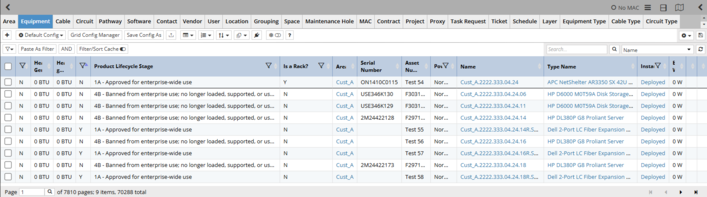
The Object Grid is the main data grid in the Main Screen that displays object instances for the selected Object tab. Selecting a tab causes the Object Grid to display a list of objects of the corresponding type.
There is a separate tab for each major variety of IRM objects, including both Type and Instance objects:
Type Objects
Instance Objects
By clicking on one of these changes not only the contents of the Object Grid, but also the Function and Filter tabs, which display which Grid Configuration and/or Filter is applied to the selected Object Grid view.
The resulting data can be filtered and arranged in several ways:
-
applying User / Named Filters
-
applying Quick/ Convenience Filters
-
-
adding / removing visible columns using cog icon
-
column order can be set by dragging and dropping column headers into preferred order
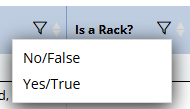
In general, any Object Grid column with a filter (funnel) icon in the header enables filtering column data. In this example, the filter icon opens a menu with only two choices, which filter Rack Equipment versus non-Rack Equipment as shown below.
IRM has many more types of very powerful filter abilities for example:
When you double click an Area in the Categories and Types tree, a filter will automatically be created in the Object Grid which is called Filter By Active Area.
To learn more please see the Named Filters section in the User Guide.
There is a tab set for object selection at the top of the Object Grid.
This bar contains a group of multiple tabs, each of which represents a major IRM object type (Area, Equipment, Cable, Location, Circuit, etc.). Selecting a tab causes the Object Grid to display a list of objects of the corresponding type.
It is also possible to open an Area by selecting it in the Object Grid then right-clicking and selecting open from the context menu as shown below.
Design World
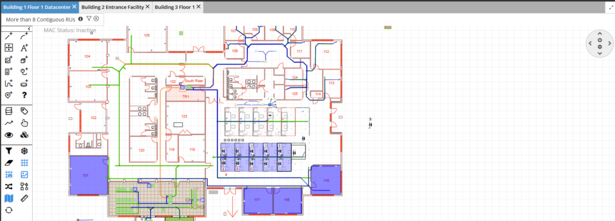
IRM utilizes an HTML canvas to display a Site’s primary drawing information, using a top-down or "footprint" view to represent floor plans, site plans or geo-spatial maps.
Other, more specialized visualizations can be accessed from within the Design World, such as:
-
Rack / Cabinet / Wallboard Elevation
-
Maintenance Hole Butterfly View
-
The Design World contains three main types of objects:
1- Geometry (either imported from CAD/GIS formats or drawn using IRM drawing tools):
-
polylines (connected sequence of line segments created as a single object)
-
-
-
-
2- Managed Objects (overlaid on top of the Geometry to represent "As Configured" or "As Proposed" managed infrastructure)
3- Auxiliary objects (not directly visible, they are still present and affect Design World rendering):
Design World Toolbox
The Toolbox menu is located on the left side of the Design World. It contains many different controls and can be hidden if you need more space for the drawing region. Hiding it is done by a toggle button above it, if clicked again, expands the toolbox to the bottom and moves the drawing slightly to the right
The Toolbox menu enable the user to directly add
-
Decorative drawing objects: Lines, Arcs, Text, Images and Blocks
-
Managed objects: Equipment, Cables, Pathways, Maintenance Holes, Locations into the Design World.
Lines, Arcs and Text get created automatically upon the button click and can be immediately positioned into the Design World. For all other types of objects, clicking on these buttons opens an additional dialog that enables specification of properties specific to that type of object.
Dialogs
IRM has a large number of dialogs many of which share the same characteristics providing conformity to the UI.
-
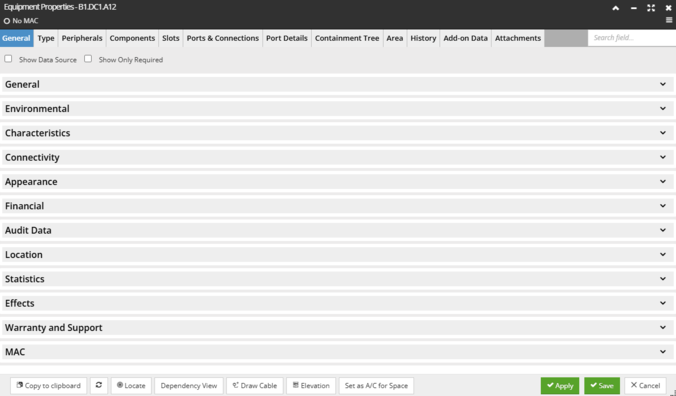
Object Properties dialogs
The most common type of dialog in IRM is the Object Properties, sometimes called Editor dialog. This type of dialog is commonly used for displaying basic properties of Instance, Type, or Category objects.
In the Properties dialog , there are many tabs, but most of the general properties including the name and basic characteristics, such as power, heat, physical size, financial data, location in a rack, etc.. can be found on the General tab as shown below.
The Environmental section in the General tab also contains all power related information for an equipment, including measured total amps, measured total watts, effective watts, power diversity, and many other fields to assist with power consumption adjustments.
-
Special visualization dialogs
These types of dialogs usually provide a combination of controls, such as tree, grid, field properties and graphical layouts for the current object. The graphic part of the dialog usually enables managing the view (zoom, navigation) and the graphically represented objects (Add, Edit, Remove).
In IRM there are many convenience features that enable defining and managing configurations which can be applied to specific objects or other parts of the application.
Some of the Dialogs that use this concept are:
-
-
-
-
Grid Configuration Manager.
The general idea is that the dialog allows managing (add / delete / edit / control visibility to) a list of configuration objects.
Editor dialogs are very similar to Object Properties dialogs, with the exception they enable working with objects other than Managed Objects (usually special objects or helper objects), such as MACs, Ports, Plugs, Cablesets, and Coordinate Systems. In most cases these dialogs are custom-designed per object type, as most of these objects are quite different both from the data and the UI perspective.
Wizard dialogs are used in order to facilitate tasks that require a number of steps to be done in sequence. These include some of the most complex operations supported by IRM, including DDR import and CAD file import. The wizards provide a simplified step by step guide through what would otherwise be a complex set of tasks.
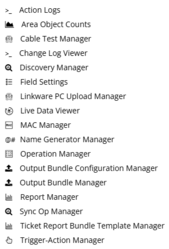
Managers
Click on the Manager button opens a drop-down menu for accessing different Manager-type dialogs. The listed menu options are named the same as the dialog, which makes it intuitive for the user to navigate and select the appropriate dialog.
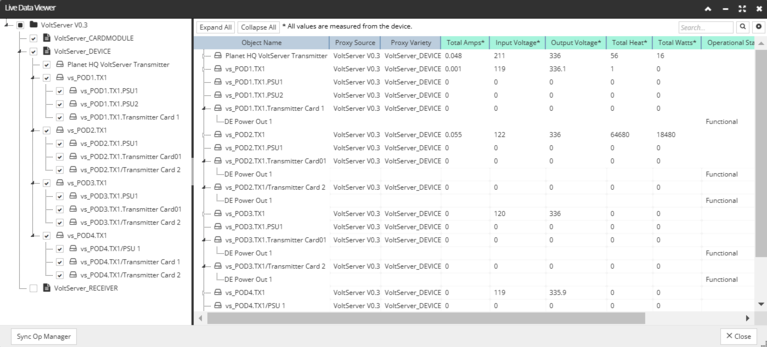
Live Data Viewer
One special manager dialog introduced in IRM v1.11is the Live Data Viewer. This dialog shows data from certain types of equipment that can be updated automatically in near real-time. Equipment to show in the Live Data Viewer is selected by clicking the checkbox next to the Proxy Variety Type in the tree on the left side; any Proxies that are connected to IRM equipment will appear in a list on the right side of the dialog, including their live update fields.
If you want to stop the updates, you can turn them off in the Live Data Viewer dialog. The updates will pause, but the last shown data will stay on the screen so you can still review it as shown below.