Selected Area Context
|
Object Grid
|
Design World
|
 |
 |
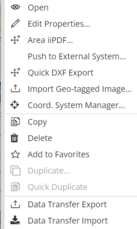
Object Grid Area Context
-
Open: Opens the selected Area in the Object Grid or C&T Tree
-
Edit Properties: Opens the Objects Editor Dialog
-
Area iiPDF: Opens the iiPDF Configuration Dialog, also you can access the Area iiPDF Manager through it.
-
Push to External System: Opens the Push to External system dialog so you can transfer IRM objects to select external systems, such as those that support CMDBs.
-
Quick DXF Export: When the Area iiPDF operation is done, a .zip file with the resulting .dxf output file appears in the browser for download and you will receive an email notification when the file is ready.
-
Import Geo Tagged Image: Opens the Geo Image Import dialog where you can upload your image.
-
Coord System Manager: Opens the Coordinate System Manager where you can Edit, Delete or Add a new coordinate system.
-
Copy: Copies the objects (Please note after coping your data and pasting into a text editor, you will see the full JSON data for teh object.)
-
Delete: Delete the Object.
-
Add to Favorites: Will add the Area in you Favorite list in the Quick View.
-
Duplicate: Makes an identical copy of the Area and its contents.
-
Quick Duplicate: Makes an identical copy of the Area and its contents, with minimal input required.
-
Data Transfer Export: Opens the Data Transfer Export dialog to start the download. Inside the dialog, you'll find options that let you customize your download preferences.
-
Data Transfer Import: Allows you to import data that was created via Data Transfer Export.
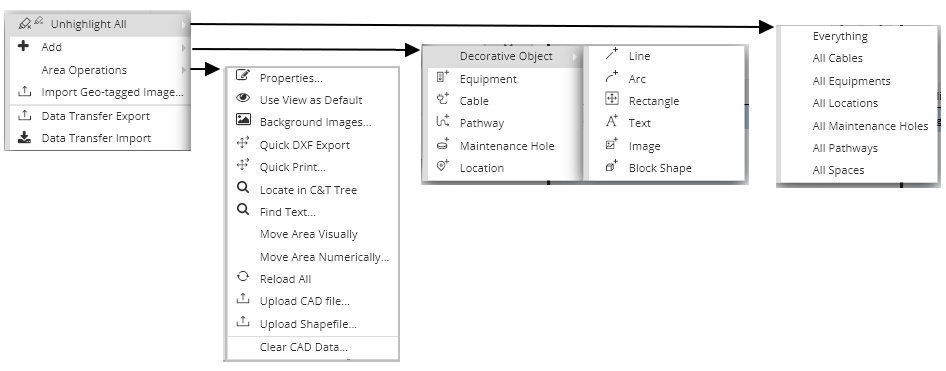
Design World Area Context Menu
-
Unhighlight All: Provides option to unhighlight specific objects in the active area
-
Everything: Unhighlights all highlighted objects in the active Area
-
All Cables: Unhighlights all highlighted cables in the active Area
-
All Equipments: Unhighlights all highlighted Equipment in the active Area
-
All Locations: Unhighlights all highlighted Locations in the active Area
-
All Maintenance Holes: Unhighlights all highlighted Maintenance Holes in the active Area
-
All Pathways: Unhighlights all highlighted pathways in the active Area
-
Add: Used to add new objects into the Areas Design World
-
Decorative Objects:
-
Line: Add Line Object in the active area
-
Arc: Add Arc Object in the active area
-
Rectangle: Add Rectangle Object in the active area
-
Text: Add Text Object in the active area
-
Image: Add Image in the active area
-
Block Shape: Add Block Shape Object in the active area
-
Equipment: Add a new Equipment in the active area
-
Cable: Add a new Cable in the active area
-
Pathway: Add a new Pathway in the active area
-
Maintenance Hole: Add a new Maintenance Hole in the active area
-
Location: Add a new location in the active area
-
Area Operations:
-
Properties: Opens the Area Properties dialog of the active Area.
-
Use View as Default: Saves the current view as the default view every time you will open this particular Area.
-
Background Images: It will take you directly to the Background Images tab in the Area Properties dialog.
-
Quick DXF Export: When the Area iiPDF operation is done, a .zip file with the resulting .dxf output file appears in the browser for download and you will receive an email notification when the file is ready.
-
Quick Print: Opens Quick Area Export dialog for printing.
-
Locate in C&T: Locates the Area in the Categories and TypesTree.
-
Find Text: Opens the Find Text Instances dialog to search for the required text.
-
Move Area Visually: Gives you the ability to drag your area in all directions within the Design World boundaries.
-
Move Area Numerically: Opens Move Area dialog where you can insert your desired coordinates to place your Area.
-
Reload All: Reloads all currently-visible data in the Area
-
Upload CAD File: Opens Import CAD File dialog where you can upload your CAD file.
-
upload Shapfile: Opens the Import Shapefile dialog where you can upload your Shape file.
-
Clear CAD Data: Clear CAD data for the whole Area. Does not delete Equipment, Cables and other IRM Managed Objects.
-
Import Geo Tagged Image: Opens the Geo Image Import dialog to upload the desired image.
-
Data Transfer Export: Opens the Data Transfer Export dialog to start the download. Inside the dialog, you'll find options that let you customize your download preferences.
-
Data Transfer Import: Allows you to import a file that was created via Data Transfer Export.
Note that when multiple objects are selected, not all of the above options will be available, and the exact set of options depends on whether all objects are in the same Super Category, same Area, etc.