4.2.3. Selection modes
This section covers two related and key items in the Web Client UI design - selection and context menus.
Selection
Definition: Being selected is a special state of a UI element, which causes the element to be drawn in some noticeable, stylized manner (e.g. with a red box around it, or a yellow background). It also creates a UI context (or global UI state) which can act essentially as an input parameter to certain operations, such as population of a context menu or processing of keyboard input.
UI areas where selection can take place:
-
Design world
-
Object Grid
-
Categories and Types Tree
-
Tables, lists and trees in dialogs
Selection-object correspondence: in the IRM object-based design, it is almost always possible to associate a UI selection with a single primary object. Strictly speaking, what is being selected is an UI element, but almost all selectable UI elements are simply representations of one or more objects, with one object as primary.
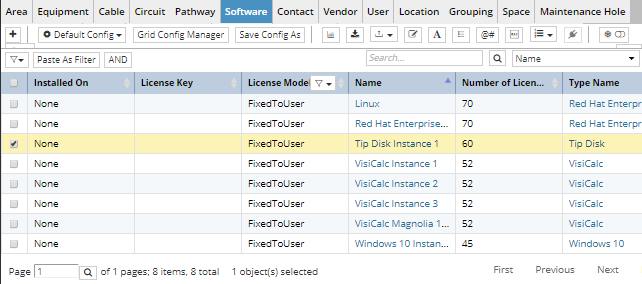
In many cases the relationship between the UI element and the underlying object is obvious, such as in the case of the Object Grid where we are largely showing a list of some specific object type:
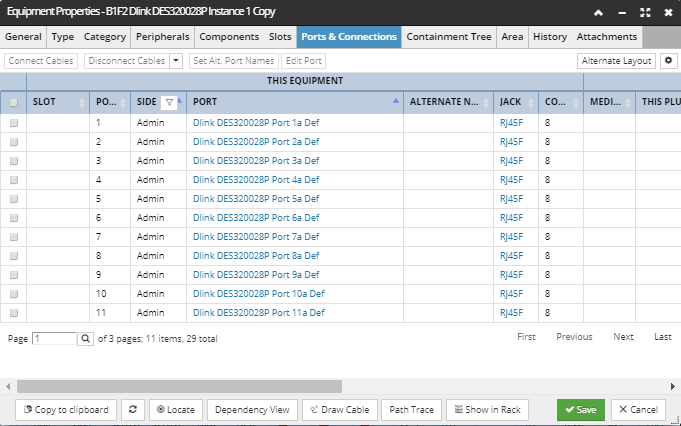
A slightly less obvious example is the Ports & Connections table in the Equipment Properties dialog; while this table takes data from several different objects in order to fill out its various columns, the primary object for each row is a Port Definition object:
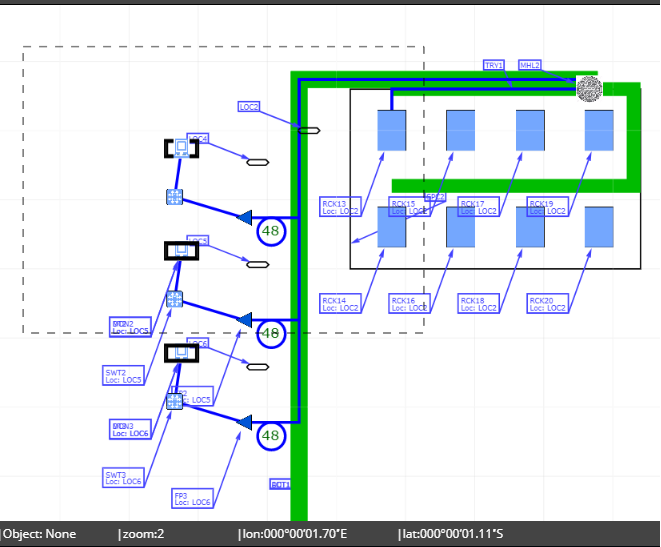
Unified concept of selection: The Web Client has a unified concept of the object(s) that are selected, which means that while the major UI areas may each have a separate internal notion of what elements are selected, these are all tied together in a unified way. Specifically, if an object’s representation is considered selected in one UI area, it is considered selected in all UI areas. For example, if an object is selected in the Design World and the same object is shown as a row in the Object Grid, the corresponding row for that particular object in the Object Grid also gets selected (as displayed in the screenshot below).
Note: This only occurs if selected object is selected in the Object Grid and the object is visible / loaded in the current grid view, since the Object Grid may have several pages of entries.
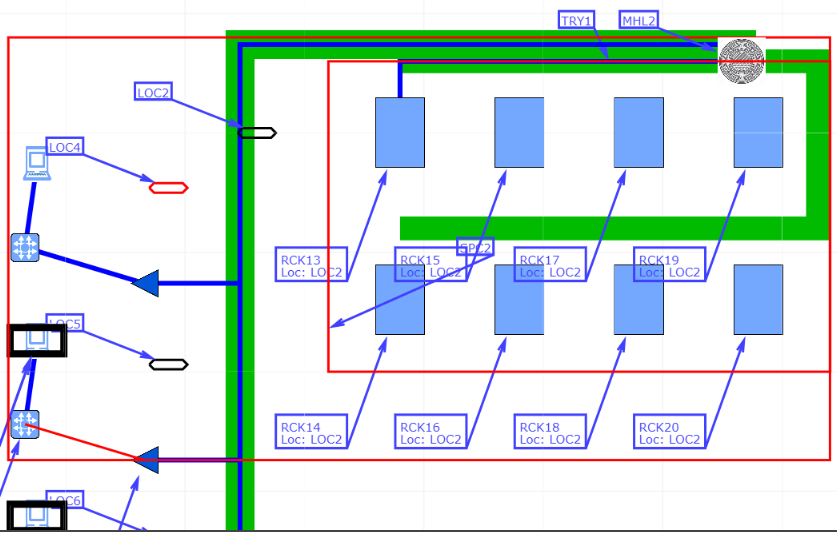
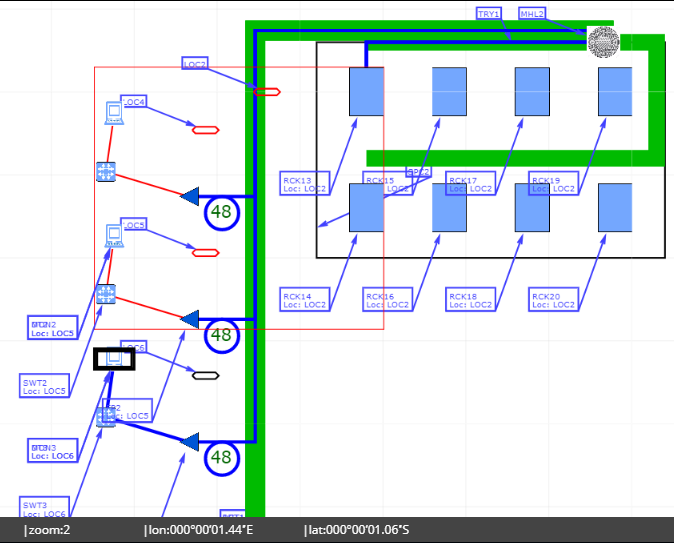
Multiple selection scope: IRM allows a “mixed type” multiple selection, so objects of different types can be considered selected at the same point in time. For example, in the Design World, by holding the SHIFT key and (single left) clicking allows multiple objects of different types to be selected.
In the example below, Equipment, a Cable, a Location, a Space object and a Maintenance Hole are all selected:
General selection mechanics (applies to all UI areas): If an element is left-clicked once, the current selection is cancelled and the object under the mouse is selected. If the CTRL key is held while an element is being left-clicked, the selection state of that element is toggled (the previous selection is NOT cancelled, unless the particular element being clicked does not support multiple selection).
Design World - specific selection mechanics
Some object types (Equipment, Maintenance Hole, Location, Label, Text) are selectable by clicking anywhere within their bounding boxes. However, other “linear” objects (Cable, Pathway, Space) can only be selected by clicking near any of the lines that represent the object. This algorithm is necessary because the bounding boxes of those object types can be quite large, making it difficult to either include or exclude the object from a selection based only on the bounding box.
If the SHIFT key is held and the left mouse button is clicked and dragged, a rubber band box is drawn and all items contained within the bounding box become the new selection set, all other items previously selected become deselected.
Step 1: Drawing Bounding Box:
Step 1: Drawing Bounding Box:
Step 2: Items contained within Bounding Box show as Selected
The user can remove items from the selection set using a bounding box by pressing both the SHIFT and ALT keys to drag a boundary around a set of objects which will either append non-selected items to the selection set or remove selected items from the selection set.
Step1: Use SHIFT+ALT to drag boundary around part of the selection set:
Step2: When the mouse button is released, the current selection is cancelled and all of the objects whose bounding box intersects the rubber band box get deselected. Basically, if the ALT key is held, the UI is in “negative selection” mode, meaning that any items included in the latter rubber band box should be deselected if they are already selected:

If the CTRL key is also held in either the previous two scenarios above, the current selection is not cancelled and the selection of the set of objects is toggled.
Multiple selection data grid and list selection mechanics
In IRM, data grids and lists that supports multiple (row) selection usually indicate that feature with an extra checkbox column at the beginning. In those grids / lists a single left click anywhere on the row selects the whole row:

The checkbox is usually also contained in the column header, enabling a convenient way to select all rows in a table / list by a single click. Row selection is toggle-based, which means a row is deselected simply by another click anywhere on it. Grids that display a large amount of data and have pagination also support displaying the number of rows selected in a text label under it (as displayed in the screenshot above).
Object Grid selection mechanics
The Object Grid enables more complex selection mechanics than the rest of the data grids in IRM.
It follows several conventions commonly used in spreadsheets:
-
Row selection is enabled by a single click on the appropriate row under the first (unnamed) column.
-
A row is deselected either by clicking on another row or clicking on an individual cell.
-
Multiple row selection is enabled via the SHIFT, but only consecutive multiple rows can be selected (e.g. rows 4-12 can be selected, but you cannot select rows 4, 6 and 12 separately).
Basically, whether the previously selected row(s) will be added to the currently selected ones is determined by the direction of the current (latter) selection - if the current selection is made in the same direction as the previous one (e.g. top to bottom, as in the first two parts of the screenshot above) the current selection will not be added to the previous one. In the other case, if the current (latter) selection is made in the opposite direction as the previous one (bottom to top, as in the third part of the screenshot above) the current selection will be added to the previous one.
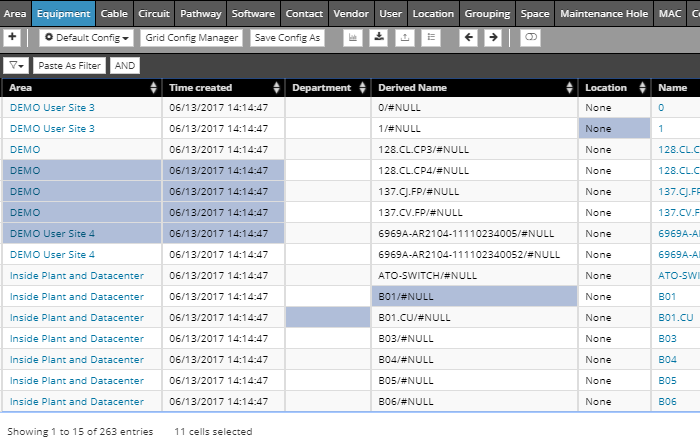
In addition to individual row selection, individual cell selection is also enabled in the Object Grid. Both cell selection and de-selection are toggle-based (a selected cell is de-selected by a single left click). Multiple selection of individual and/or consecutive cells is also enabled. Holding the CTRL key while clicking on the cells will select individual cells whereas by holding the SHIFT key while clicking on the cells selects all intervening cells between the two clicks, and holding both the SHIFT and CTRL keys while clicking on the cells adds the individual selections to the previous ones.
The screenshot below displays a combination of the latter two cases: the first block of cells is selected by clicking while holding the SHIFT key and the other individual cells are added to the selection by clicking while holding both the SHIFT and CTRL keys:
Object Grid enables pagination and also displays the number of rows / cells selected in a text label under it (as displayed in the screenshots above).
Selection Modes
In order to facilitate both a variety of operations on objects and efficient mass/bulk selection of large numbers of objects, the selection mechanism has the following distinct modes of operation. Different types of selection are depicted differently, which gives clues as to the functionality available in each of the modes.
Single selection: This is the mode entered when a single object is clicked without modifiers. Exactly one object is selected and if the object is visible in the Design World it will have manipulation handles, if appropriate for that type of object. The manipulation handles allow for a variety of detailed operations on the object, such as moving, resizing, changing the x,y of specific vertices (for line-type objects), etc. This selection mode is the only mode that enables these detailed handles.
The screenshot below displays an example of a single Location object (and its Label) using single selection mode. Notice the manipulation handles for both objects; the handle on the Label allows the Label to be repositioned independently of its parent object:
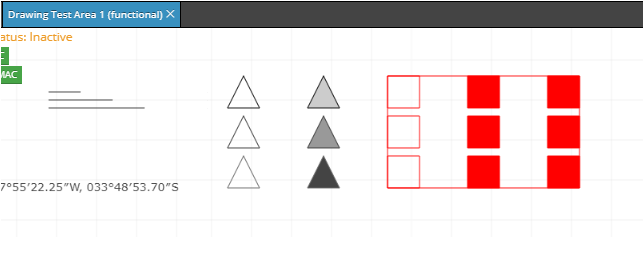
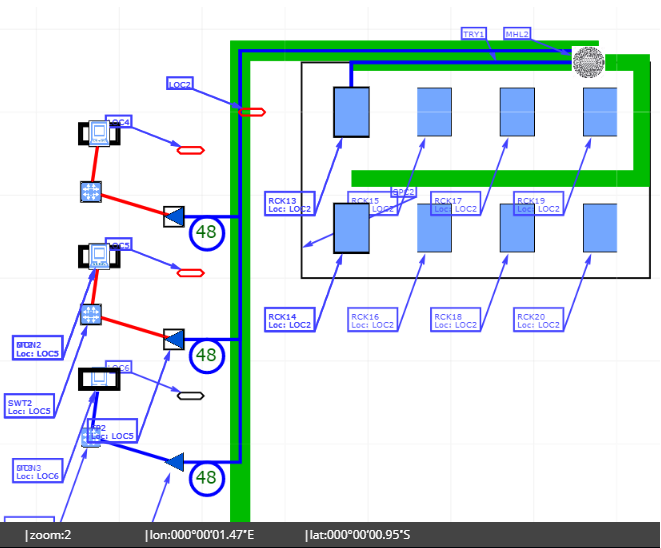
Multiple selection (All objects in same area): This mode is entered when multiple objects in the same Area are selected via any means, such as the rubber band box or incremental selection. As all of the objects are in the same Area, they can be depicted and operated on in the Design World. A bounding rectangle is drawn around all of the selected objects and each object is drawn with its own selection box (see the screenshot below). The bounding rectangle or any of the selected objects can be click-and-dragged to move all the selected objects.
Multiple selection (All objects in different areas or in no area) - this is enabled for e.g. Equipment in Spares, but also for a type not supported by the Design World, like Vendors. This can be done combining several common (and mentioned) actions: holding the SHIFT key, selecting the other Area tab and click+drag around the other object group that needs to be selected. Because the objects are not all contained within an Area, operations such as "move" are not well defined and are therefore precluded; only operations that don’t cause confusion or difficulties in the Design World are available, such as deletion, highlight / unhighlight, etc.
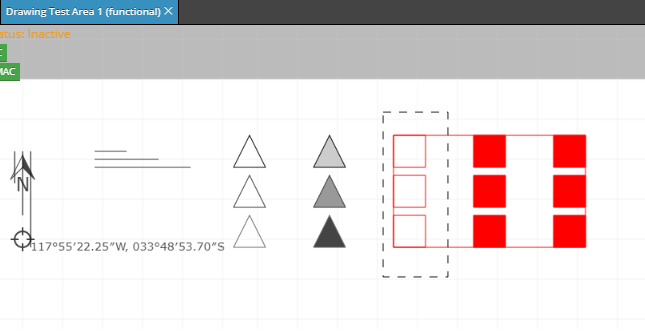
In the example below, some objects are drawn with the selection border or color, but there is no bounding rectangle drawn, which is how this mode is visually distinguished from Type 2:
Multiple selection with all objects contained within two or more Areas which are shown in the same canvas: Unlike the other selection modes, this mode depends not only on what is selected, but on which Areas are opened in the Design World. It behaves much like multiple selection within a single area, but subject to an important restriction. The restriction is that it's only entered if all of the selected objects are in 2 or more Areas and those Areas are only opened onto canvases that contain all of them. The idea is simply to support this behavior in a multiple Area canvas. This is possible only if there isn’t some canvas for which such display and operation would be problematic, such as a canvas that shows only one of the relevant Areas.
Note: IRM v1.0 does not support multi-Area canvases and therefore does not support this selection. These features are expected to be include in IRM v2.0.
Importantly, the current selection mode is a function only of what is selected, not how it got selected, and global to the entire Web Client user interface. It is not some special feature of the Design World or some other component, although the Design World or other components may respond in some special way to a mode transition or behave differently in different modes (that is more or less the point).
Selections modes that can contain objects from different Super Categories means that objects can be selected in more than one Object Grid tab at the same time. However, those selections are not independent, they are part of the same single global selection. Therefore, if the selection is cancelled, the selections for all Object Grid tabs and all canvases are cancelled.
There is an upper bound on the total number of objects that can be selected at one time. Regardless of how it happened, if the selection bound is exceeded, the selection is cancelled and a transient warning box is displayed, explaining what happened. Such a restriction is a practical necessity in order not to compromise Web Client performance and caching.
Note: IRM includes special features designed to mitigate any inconvenience caused by the selection bound, such as operations on all objects in an Area, regardless of how many there are - 3.3. Areas.
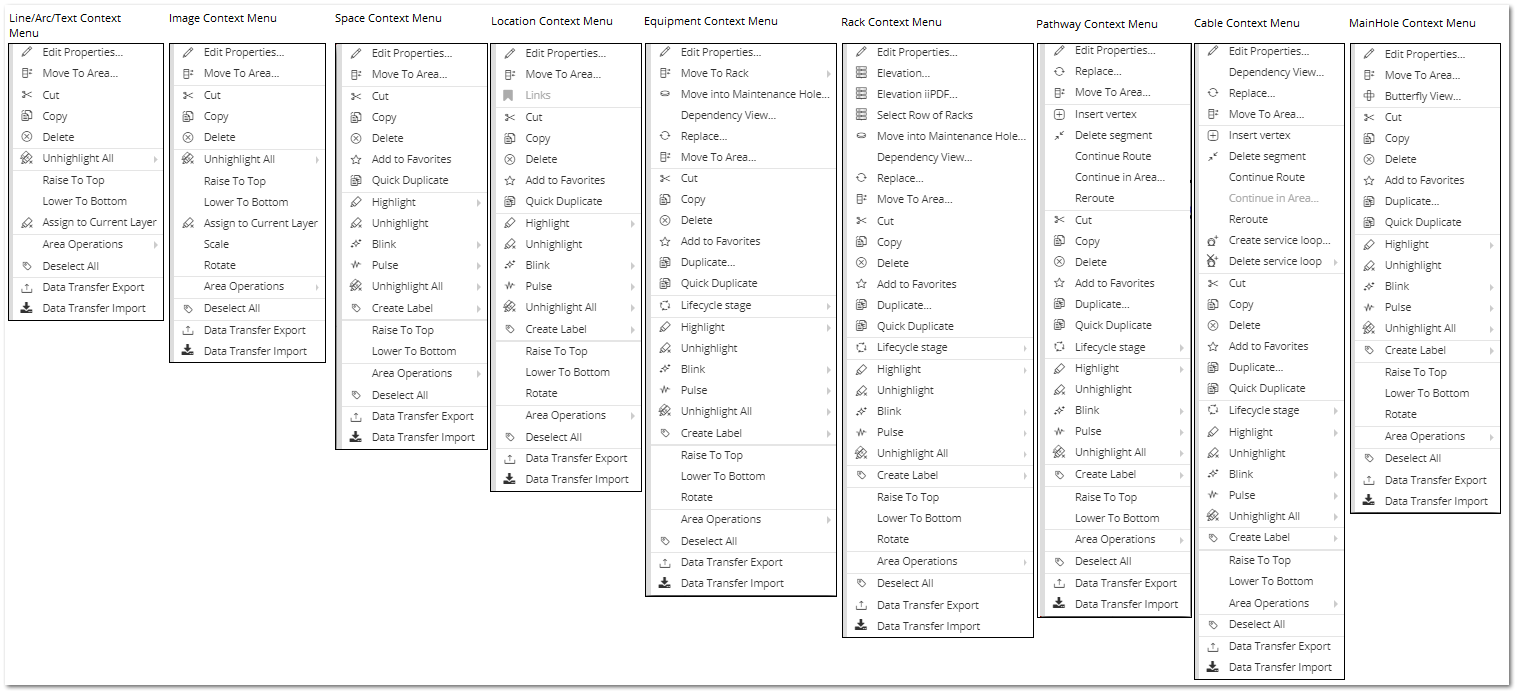
Context menus
The context menu is activated by a right mouse button click. The “context” used by the context menu is determined by either what is selected or what is under the mouse.
When a selection includes objects within the same super-category, then the full context menu for that super-category is displayed but, when a selection contains multiple objects in different super-categories, the context menu only provides options that are common to objects in the selection:

When a selection includes objects within the same super-category, then the full context menu for that super-category is displayed but, when a selection contains multiple objects in different super-categories, the context menu only provides options that are common to objects in the selection:
Context Menu options for each Super Category Object
Each type of object has an associated set of context menu options, such as Edit, Delete, or Elevation associated with it. Some options are only available when a single object of the right type is selected (e.g. Rack Equipment Type for the Rack Elevation and Maintenance Hole for the Butterfly Diagram).
Other options are only available when one or more instances of a single Super Category are selected (e.g. Edit). Finally, other options are available even when different Super Categories of objects are selected (e.g. Delete or Unhighlight). Generally, this last set of options is the intersection of the sets of options for all selected object types, and therefore is usually quite restrictive.
If one or more objects are selected, the context is determined exclusively by the types (generally the Super Categories) of objects that are selected, regardless of what is under the mouse:
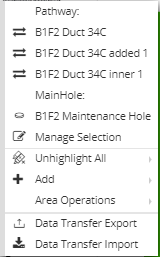
Disambiguation Menu
If no objects are selected and one or more than one object is under the mouse, IRM opens the selection disambiguation list, which in this case acts the same as the left mouse button, for object selection. After an object is chosen from the list, that object gets selected in the drawing and the appropriate context menu is opened. The Context menu will provide options to Manage Selection, which is used to select specific objects, it will also provide a list of objects found at the point of selection and these are grouped by their associated super-category.
In the following example we can see 3 Pathway entries and a Main Hole entry found at the point of selection in the area:
No selection Design World context menu
If no objects are selected and no object is under the mouse, the context is determined purely by the UI area. For example, the Design World will likely have a different set of context menu items than the Object Grid. In Design World, when context menu is initiated when no object is selected, or under the mouse cursor, it displays a few available options, some of which make actions for all types of objects, like the Unhighlight All option:
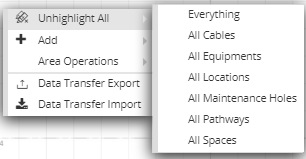
This simple bulk un-highlight option displays a separate entry for each Design World object plus one that enables un-highlighting all objects in the active Design World Area.
Similarly, there is an Add option, which contains a submenu for all Design World-related object creation options, all of which are already contained in the Design World toolbar:
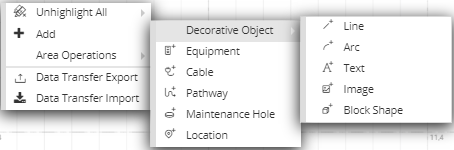
Note the Decorative Objects are grouped together, while all other (Managed Objects) are listed below.
Area Operations are grouped as a third option, enabling different Area-specific and Design World-specific operations, some of which are already contained in the Function bar in the main application screen.
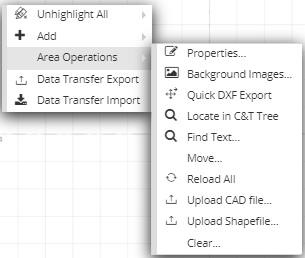
Finally, the Data Transfer Export and Data Transfer Import options are displayed as last one.
Design world drawing and selection precedence
The same definition of precedence for both drawing and selection is used. If an object is drawn on top (higher drawing precedence) then it also has higher selection precedence. The general concept is that “small rectangular” objects have the highest precedence, followed by the “linear” Managed Objects (Cable and Pathway), followed by decorative drawing objects, followed by background images.
The following is the precedence list for drawing objects in order of decreasing precedence; next to the object name is a description of its representation in the screenshot below that displays drawing precedence in the Design World when objects are drawn stacked on each other:
-
Rack (blue rectangle on top)
-
Equipment (other than a rack, blue desktop icon)
-
Maintenance Hole (black circle shaped hatch icon inside of a white rectangle)
-
Location (gray rectangle with darker gray border)
-
Label (dark brown text with border and an arrow pointing to the blue cable / line)
-
Space (not displayed in the screenshot)
-
Cable (blue line placed vertically against the big text under it)
-
Pathway (thick green line placed under the Location Block)
-
Text (big black text "Default text")
-
Line/Arc (thin black line placed diagonally from the bottom-left corner to the top-right corner)
-
Background image (not displayed in the screenshot)