Use Case - Add / Connect / Disconnect Plugs and Media
This section will cover the operations of assigning and connecting Plugs and Media. The following screenshot images and text below display the Cable Type Properties - Plugs tab dialog and all sub-dialogs associated with these operations. The purpose of this example is to show all different ways of assigning and connecting Plugs and Media. In IRM, there are two ways a Plug can be associated with a Media - a Plug can be added / assigned to the Media, but does not have to be connected. In this example the two are separated operations.
Use Case - Manual connect Plugs and Media
This use case describes operation of manually connecting a single fiber Plug to a single Media of the selected Cable Type. It is useful for Cable Types that have relatively few Plugs, like one at each end, or cases where it is necessary to have exact control over which Media are connected to which connection points in the Plug.
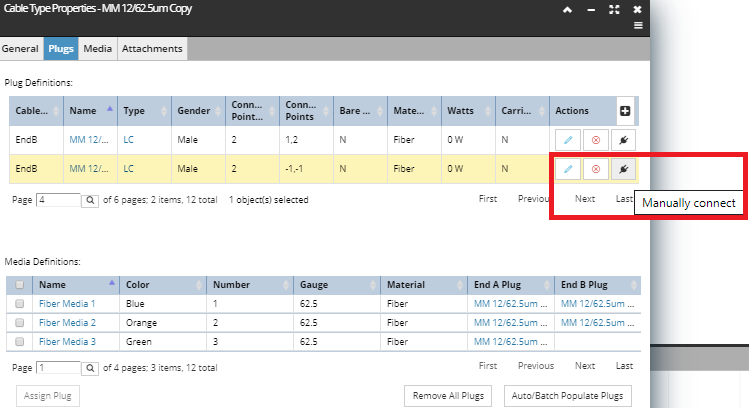
 Plug action buttonThe operation is started with a click on the Plug action button next to the row entry in the Plug Definitions grid:
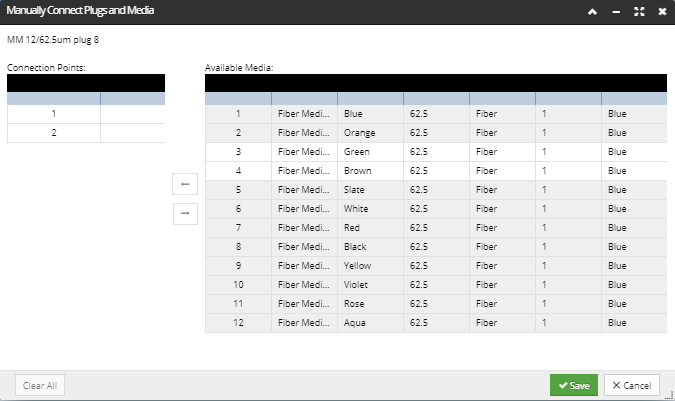
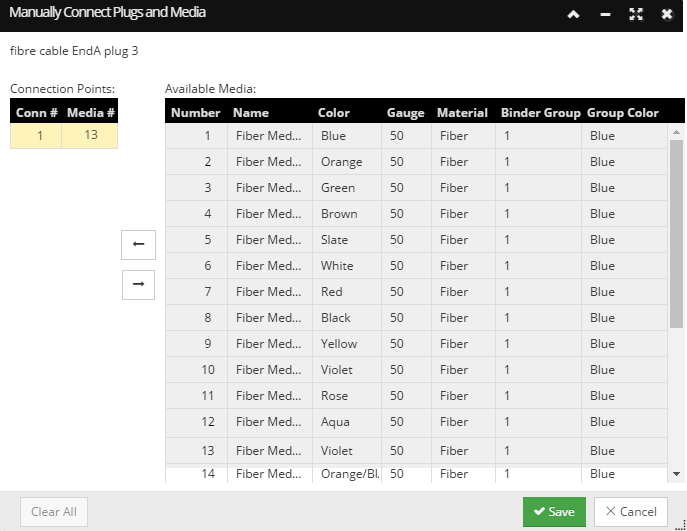
This opens the Manually Connect Plugs and Media sub-dialog, which is used to make associations between the Cable's Media and the Plug's Connection Points:
The dialog displays 2 grids:
-
The Connection Points on the left shows the list of the plug's Connection Points -
Additionally, there are two arrow buttons that enable connecting and disconnecting single Plugs from Media. The operation is finished with either saving or dismissing the changes by clicking on the appropriate button (Save / Cancel), which closes the sub-dialog and brings focus back to the (main) Cable Type Properties dialog.
|
 View Plug Definition NameThe Plug Definition is displayed at the top-left side of the sub-dialog as a text label.
|
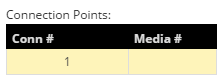
 Select Plug's Connection PointThe Conn# column lists all Plug Connection Points ("1" in this example, since this is a single fiber cable). If the Plug is not connected to the Media, the Media# column for that row entry is empty (as in this example).
|
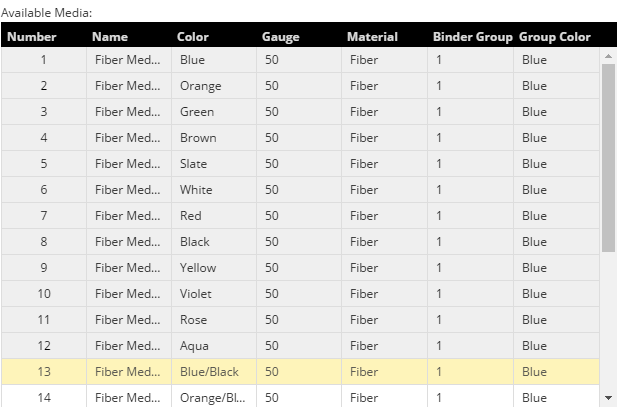
 Select Available MediaThe Available Media grid displays the list of available Media Definitions for the selected Cable Type, along with basic Media properties. The Number column represents the Media # defined in the Cable Type and corresponds to the Media # column in the (left-side) of the Connection Points grid.
Note: If the Media entry is already connected, it is grayed out in the Available Media grid and cannot be selected.
|
 Click Left arrow button to connect Media to Plug(s)Click on this button populates the appropriate field under the Media # column for the selected Plug entry in the Connection Points grid with the Number value from the selected Media entry from the Available Media grid.
This also deselects, grays out and disables the selected Media row entry (as displayed in the screenshot below):
Note: This button is enabled only if both non-connected Plug and Media entries are selected in the appropriate grids.
|
 Click Right arrow button to disconnect Media from Plug(s)Click on it removes the appropriate field under the Media # column for the selected Plug entry in the Connection Points grid, essentially undoing what the left arrow click had done earlier. This also enables the previously connected Media entry from the Available Media for selection again.
Note: This button is enabled only if a connected Plug entry is selected in the appropriate grid.
|
 Click Clear All button to remove all connections for the selected PlugClick on this button removes all connections between the selected Plug and Media Definitions.
|
Use Case - Auto / Batch Populate (Add and Connect)
This use case describes the operation of connecting a single fiber Plug Definition to End A Media of the selected Fiber Cable Type. Auto / batch population is useful as a shortcut for creating Plugs and immediately connecting them in cases where Plugs and Media are connected in a simple way (straight across), using a single Plug Type.
This operation starts in the Cable Type Properties - Plugs tab dialog, by selecting the Plug and Media row entries that need to be connected and clicking the appropriate button. This opens the Auto / Batch Populate (Add and Connect) dialog, which remains open until Close is clicked. It allows adding and connecting multiple plugs of different types without having to keep re-opening the dialog.
 Click "Auto / Batch Populate" buttonThis button is located under the Media Definitions grid. Click on it opens the Auto / Batch Populate (Add and Connect) dialog, which remains open until Close button is clicked. This allows adding and connecting multiple plugs of different types to all non-connected Media without having to keep re-opening the dialog.
|
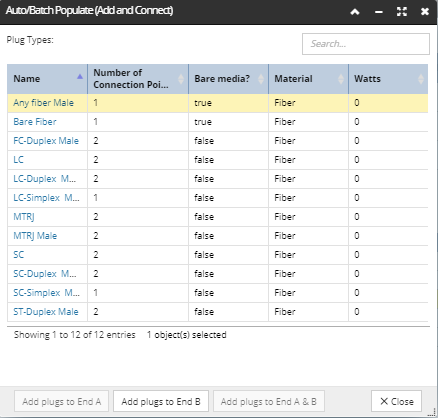
 "Auto / Batch Populate" sub-dialog opensThis dialog enables adding and connecting Plugs to all available Media at the selected end in a single operation (explained in more detail in next steps).
|
 Select Pug TypeClicking on one of the row entries from the Plug Types grid selects it and enables buttons at the bottom of the sub-dialog, depending on which cable end is available for adding plugs.
|
 Select Cable endWhen adding (and connecting) a Plug to a Cable, the Cable End on which the Plug is found must be specified. This is done clicking on the appropriate button at the bottom-left side of the sub-dialog (Add plugs to End A in this example). Click on this button creates a new Plug Definition entry in the (main) Plug Definitions grid for the Cable Type. This also sets the appropriate values for the associated Media Definition entries in the Media Definitions grid.
|
 Finish the operationClick on the Close button closes the Add Plug Definition subdialog and returns to the Plug Definitions grid in the main Cable Type Properties dialog.
|
Use Case - Assign / Connect Plugs and Media
This use case describes the operation of connecting a Plug definition to a Media definition from the main Cable Type - Plugs tab dialog. It assumes both the Plug and the Media have already been created, but not yet mapped.
The operation is started with selection of a Plug from the Plug Definitions grid, following by selection of a Media from the Media Definitions grid.
This enables the Assign Plug button on the bottom-left side of the dialog. This dialog also enables removing all Plugs connected to the cable's media. All changes made in this dialog can be saved or dismissed by clicking on the appropriate buttons in the bottom-right corner of the dialog.
 Select Plug entrySelect a non-connected Plug entry from the Plug Definitions grid. The the "-1" value under the Connection Points column indicates that a Plug entry is not connected.
|
 Select Media entrySelect a non-connected Media entry from the Media Definitions grid. The empty fields under the End A Plug and End B Plug columns indicate that a Media entry is not yet connected.
|
 Click "Assign Plug" buttonClick on the Assign Plug button assigns the selected Plug entry to the selected Media entry on the selected cable end. In this example, a single fiber Plug is connected to the selected Media on the end A of the cable. This populates the Connection Points column of the connected Plug entry with the number of connection point of the selected Media entry (13) and the End A Plug column of the connected Media entry with the name of the connected plug (fiber cable EndA plug 3).
|
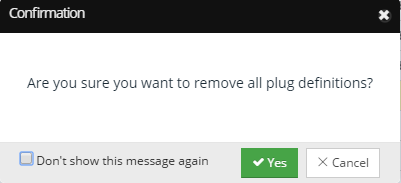
 Click "Remove All Plugs" buttonClick on the Remove All Plugs button opens a Confirmation pop-out dialog, asking to confirm the removal of all Plugs. If the removal is confirmed, all Plug entries populated in the End A Plug and End B Plug columns in the Media Definitions grid are cleared, which indicates that all Plugs are disconnected and removed from all Media of the selected Cable Type.
|