One of IRM's convenience features is the View Manager, the purpose of which is to enable the user to conveniently save and manage the current view in the Design World, including:
-
-
position (x,y or latitude, longitude)
-
This feature is useful when working with many Areas or large Areas, because it allows the user to designate places of interest and be able to go there quickly, essentially similar to web browser bookmarks and other "shortcut" mechanisms commonly available in modern software.
To use the feature, the user sets up the view of interest and then uses the View Manager to create a new View object (or "named View") from that setup.
View objects can also be used in conjunction with Location objects, where multiple Destination Views can be specified / assigned for a certain Location, in such a way that when the user selects that Location object, the currently displayed View in the Design World automatically changes to the one assigned for the selected Location.
The View Manager dialog is the central point for administering Views.
Similarly to other Manager dialogs throughout the application, it enables the following features:
-
-
apply a view from the Views grid to the Design World
-
duplicate a view in the Views grid
-
remove a view from the Views grid
These and other features of View objects are explained in more detail in the following text and screenshot through the common use case scenario of saving the current view in the Design World as a named View:
 Access View ManagerTo access the View Manager, click on  in the Design World to open the View Manager dialog
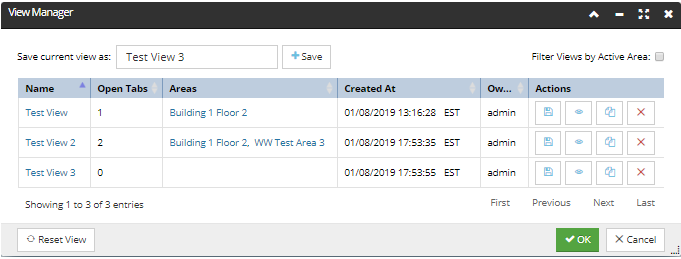
The main part of this dialog is reserved for main grid, explained in more detail in one of the next points, same as additional options displayed in the dialog.
|
 Save current ViewTo save the current View in the Design World, simply enter an appropriate name in the text box and click the Save button. This automatically clears the text box and displays the newly defined View as the top row in the main grid. Note that entering a Name is not mandatory for a creating a new View; a new view can be created simply by click the Save button without specifying a name. In that case, a default name is assigned automatically, which includes a unique ID number.
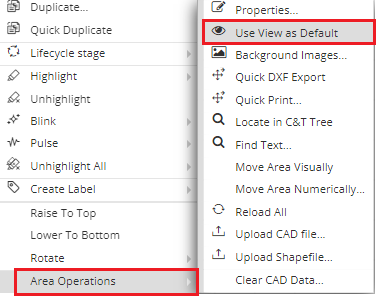
Also, it's possible to set region/zoom level to apply when an Area is opened via “Area Operations → Set View as Default” context menu option.
|
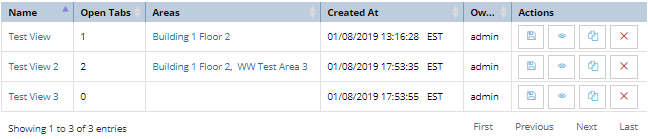
 View and manage existing ViewsOnce a new View object is created, it's automatically displayed in the top row of the main grid in the dialog. Each View object listed in this grid holds the following data:
-
-
Count of currently Opened Tabs in the Design World -
name of Areas opened in the tab(s) -
-
Owner, or the name of the User who created the View
Inline Action buttons enable user to
 - Save the Current View state over top of an existing View  - Apply one of the existing views listed in this grid as the current on currently displayed in Design World  - Duplicate one of the existing views listed in this grid  - Delete one of the existing views listed in this grid
In addition, a checkbox option above the main grid enables to Filter the Views listed in it by Active Area:
while the Reset View button at the bottom-left side of the dialog resets the current View state in Design World.
This button is a part of another feature that auto-saves the View automatically for the current user, including changes made in the Layer Manager. So, in cases when the auto-saved view somehow gets corrupted, it can be useful to click on this button and reset the View.
|
Another way to set the currenct