Creating / Editing Tickets
This topic provides a general overview of each property that can be configured while creating or editing a Ticket in IRM, while the
following subtopic demonstrates a common use case scenario of editing an existing Ticket in IRM.
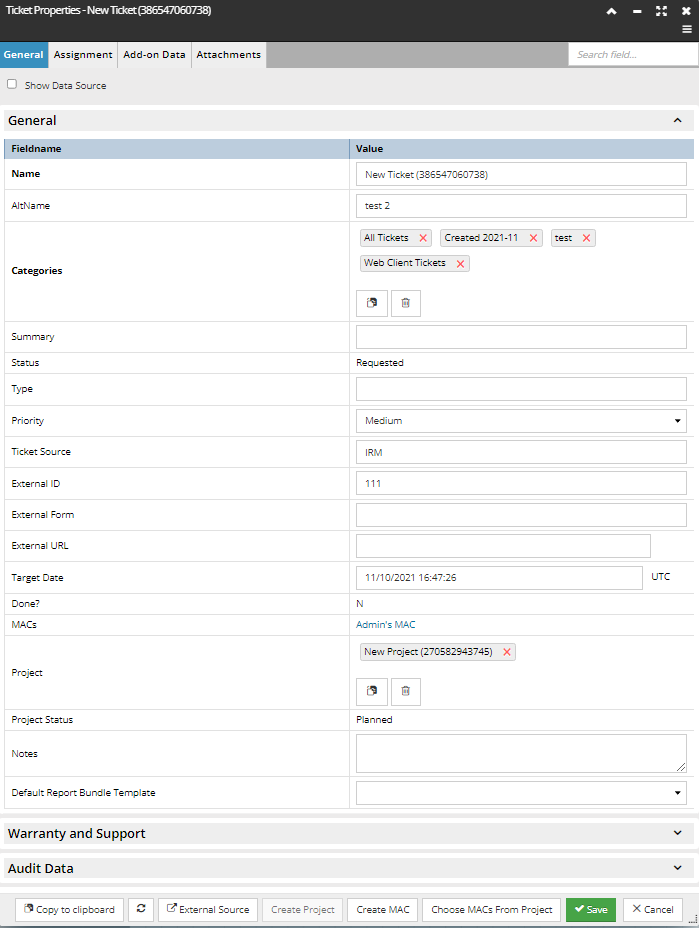
The following is a screenshot of a sample Ticket Properties dialog, followed by a basic explanation of relevant Ticket-related properties below:
Summary - arbitrary text string describing the Ticket
Status - can be one of the following:
-
Requested - the default Status assigned to new Ticket objects.
-
In Progress - auto-assigned Status that gets set once a MAC is assigned to the Ticket and the MAC Status is Open.
-
Ready For Review - all MACs in the Ticket are Locked.
-
Commit Desired - set when the user commits the Ticket- NOT if it was previously set to "Ready for Review".
-
Committed** - commits all associated Locked/Open MACs
-
Cancelled** - cancels all MACs assigned to the Ticket.
**For a Ticket linked to an external ticketing/change request system (like BMC or ServiceNow) this status can be set by a change made in the corresponding external ticket.
Type - text string specified by the user
Priority - can be set by the user to one of the following values: Low, Medium, High, Critical. Depending on this, the Ticket Manager icon in the main screen gets shaded to an appropriate color.
External Id - ticket ID in the external system
External Form - name of the form in the external system, if any
External Ticket URL - URL to open ticket in external system
Done? - set by the relevant Integration Service and identifies if the parent ticket is open or closed.
MACs - list of MACs associated with the Ticket, click on the name opens the relevant MAC object
Project - displays IRM Project objects associated with the Ticket as individual text labels. Clicking on the Clipboard button causes a single Project on the internal Clipboard to associate with the Ticket. Clicking on the Trashcan button removes all associated Projects. Individual Projects can be removed by clicking on the x under the name label.
The following caveats and restrictions apply regarding adding existing Projects:
-
If anything other than a single Project is on the clipboard when user clicks on the Paste button, an error message is displayed saying "Only a single Project can be pasted."
-
Otherwise, a Yes/No sub-dialog opens, asking the user if he/she wants to include all MACs from the Project to the Ticket. This is a convenient way for the user to be reminded to add related MACs to the Ticket, though it can also be easily done via the
Choose MACs from Project button.
-
A Project that is Completed, Cancelled, or Archived cannot be added to a Ticket – if attempted, an appropriate error message is shown.
-
If a Ticket is Committed or Cancelled a Project can’t be added or removed.
-
If the Ticket is Requested and a Project is added, the Ticket is automatically moved to In Progress
The bottom of the dialog contains several buttons that either open another dialog or do some other action relevant to the Ticket being edited and / or created, in addition to the standard Copy to Clipboard and Refresh buttons:
External Source - if this Ticket was created from an external system (BMC, for example), clicking on this button opens the Ticket in that external software in a new browser tab. Specifically, the user is redirected to the web address specified under External Ticket URL.
Create Project - allows a Project to be created and added to the Ticket. Clicking on it automatically opens a new instance of the Project Properties dialog.
Create MAC button - Opens a popup dialog for specifying basic MAC Properties, such as Name and Public/Private. After entering the relevant data, clicking on the Create and Enter button closes this and opens a new MAC Properties dialog, which allows the user to specify the rest of the properties. The Create MAC button can be clicked multiple times if needed.
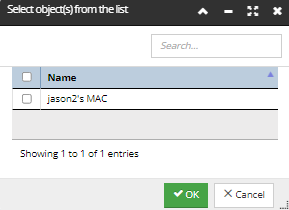
Choose MACs From Project - shows a list of MACs from the Project and allows any of them to be added to this Ticket (by checkbox selection):