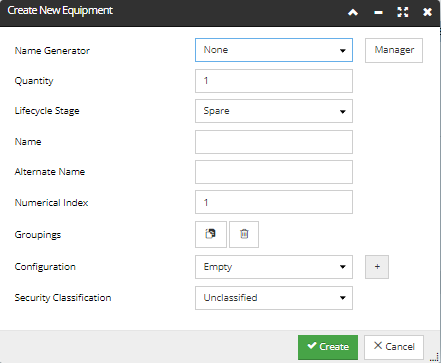
Planet Associates Inc
×
Menu
Index

4.3.5.1. Creating Equipment in the Design World

  
This feature enables adding new or spare equipment objects into the Design World. It is activated by clicking on the Create Equipment button in the Design World toolbar.
1

Click "Create Equipment" button

Located in the top section of the Design World's Toolbox. This opens the Place Equipment dialog, with the Equipment Category and Type tree menu on the left and an Equipment instance grid on the right:
2

Select Equipment Type or Category from Equipment C&T tree menu

The tree menu on the left of the Place Equipment dialog displays all Equipment Types grouped by Categories in a tree structure, basically the same as in the Equipment section of the main screen's C&T menu. Clicking on an Equipment Category or Type populates the Equipment instance grid on the right of the dialog with available Equipment instance(s) of that Category or Type.
 
Since a Site can contain multiple thousands of different Equipment Types, additional conveniences enable the user to find the desired Equipment Type easier and faster - the Quick Search box and the Expand All / Collapse All buttons above the tree menu.
3

Select Equipment instance, or click "Create New Equipment From Type" button

If the selected category or type contains no available equipment instance(s), the grid displays 'No data available in table' text message, as in the screenshot:
 
In this case, click the Create New From Type button at the bottom-left of the dialog, which enables a quick creation of Equipment instance(s) from the selected Type, without interrupting the Place Equipment operation :
4

Configure the new Equipment instance

This opens the Create New Equipment sub-dialog, displaying several parameters that allow creation of one or several objects in a batch:
 
The first field to specify is an optional Name Generator, which can be either selected from the drop-down menu, or created via the Name Generator Manager, accessed by click on the Manager button. By default, this field is blank. Click on the following link for more details about this feature.
 
The Quantity field defines how many equipment instances are going to be created from the selected equipment type or category (default = 1). If a number greater then 100 is entered, a warning pop-out dialog appears displaying a warning about the quantity of created items.
 
Next, select the Lifecycle Stage from the drop-down list (the default state is Spare).
 
Next, specify the new Equipment's Name as follows:
Any set of alphanumeric characters, where any contiguous sequence of the special symbol "#" gets replaced by the current numeric index value, and "@" is replaced by the current alphabetic index value (see Index items below); the number of contiguous "#" symbols indicates how many digits are generated, with leading 0's pre-pended as necessary, and the number of contiguous "@" symbols indicates how many letters are generated, with leading spaces pre-pended as necessary.
The following table provides an example of using either numerical or alphabetic indexes to identify Equipment:

 
Numerical Index Example
Alphabetical Index Example
Name
EQP-###
EQP-@
Index
1
A
Quantity
3
3
Results
EQP-001
EQP-002
EQP-003
EQP-A
EQP-B
EQP-C
 
Note: If the user attempts to manually create an object with a duplicate name or rename an object with a name that already exists, a dialog opens that explains that another object with the same name already exists and provides a hyperlink to that object. The new object creation or rename operation fails.
 
Next, specify the Alternate Name, that is, the short version of the object's name used in labels and other UI contexts, as any set of alphanumeric characters. You can use the "#" and "@" symbols in the exact same way as the Name field.
 
Next, specify the Numerical Index - the initial value for a numeric value that is auto-incremented in case of multiple Equipment instances of the same Equipment Type. This value replaces any contiguous sequence of "#" in the Name field value, to generate the name of the equipment entry, then the Index value will be incremented. For example, if Name = "Dell Switch instance #" and Index = 4, the first added equipment entry will be named "Dell Switch instance 4", the second will be named "Dell Switch instance 5", etc.
 
Optionally, the newly created Equipment instance(s) can be assigned to different Groupings, simply by copying the desired Grouping object in the Clipboard and clicking the Paste button under the Grouping field name. In case a wrong Grouping object has been pasted, it can be easily removed by click on the x under the Grouping name label. Alternatively, click on the Trashcan button next to the Paste one clears all Grouping objects:
 
- the Configuration drop-down menu enables the user to select from a list of existing Configurations. In addition, the + button takes the user directly to the Slot Arrangements tab of the Equipment Type Properties dialog. This way, the existing Slot Arrangement Configurations can be reviewed, or a new Configuration can be conveniently created. This is enabled in the "Create New Equipment" dialog, opened both from Main Grid Toolbar and Design World Toolbox from Place Equipment dialog
 
The Security Classification selection is visible in All Add Equipment dialogs (see image above). Whenever the classification is changed for an Equipment object, it is automatically changed for any contained objects, such as Equipment in a Rack, Equipment in a Slot , Equipment in an Equipment, Equipment in a Maintenance Hole and Equipment as Components.
5

Click "Create" button to confirm Equipment creation

5. Click "Create" button to confirm Equipment creation
Clicking on Create button closes the dialog, brings focus back to the main Place Equipment dialog and adds the newly created instances to the grid (displayed in the next step). Click on the Cancel closes the dialog, brings focus back to the main Place Equipment dialog without making any changes.
6

View and select created Equipment instances in the "Equipment Instance" grid

Equipment Instance grid displays available instances for the selected equipment type or category. Selecting equipment category or type populates the Equipment instance grid with available equipment instance(s). In this example the equipment instances created in previous steps are displayed for the selected equipment type. The fields under Type, Alternate Name, and Derived Name columns are hyper links and clicking on them will open the appropriate Object Properties or Type Properties dialog.
7

Click "Place" button to confirm Equipment drawing in Design World

7. Click "Place" button to confirm Equipment drawing in Design World
Clicking on Place button closes the dialog. If more than 1 equipment instance is selected for placement in Design World an additional Place Equipment in Design World dialog opens (explained in the next step). If only 1 equipment instance is selected for drawing in Design World the sub-dialog is closed and brings back focus on the main application screen with the cursor in Design World in drawing mode (see last step). Clicking on Cancel closes the dialog, brings focus back to the main application screen without making any changes.
8

Select Equipment layout in the "Object Placement Options" dialog

This dialog enables setting the Equipment position according to a row or column layout. It enables setting the Number of rows / columns, and Row / Column offset values in inches or centimeters, depending on user preferences. The user also has the option to accept the defaults if desired.
9

Place the new Equipment in Design World

After the appropriate layout is set, and the Place button is clicked (in previous step), the Equipment appears "floating" in Design World and the mouse pointer appears as crosshair. Left click on a desired position places the equipment at that location.
10

Align Equipment in Design World

After placement in the Design World, it is possible to visually align Equipment via a context menu option, which is active when multiple Equipment in the Design World are selected - "Align & Arrange".
Note: This feature works for Equipment, Maintenance Holes, Locations and Spaces.
 
The Arrange Horizontally / Vertically options position the selected Equipment objects next to each other, so that their bounding boxes follow each other in horizontal or vertical direction.
 
The Align Horizontally / Vertically option effectively computes the position of the "center of mass" of the selected objects and moves the centers of all the objects to that point. All objects are assumed to have identical mass, or in other words, the x coordinate of each object is set to the average x coordinate of all the objects, and similarly for the y coordinate. 
 
TIP!
 
This feature can be used to effectively to make small tweaks to the position of a stack of objects by the following procedure:
  • Select and move any one of the objects a short distance in the desired direction.
  • Select all the objects and use the Align (to center) feature.
     
The above will move all the objects in the desired direction, but only a fraction of the distance the one object was moved.  For example, if there are  6 objects and you move one object 12 inches in step 1, after step 2 all the objects would move only 2 inches.  This can be an effective way to fine-tune object stack positions for people who have trouble doing it directly for whatever reason.