4.3.5.7. Inserting a Rack into the Design World
The following example displays a use case of inserting a Rack instance in Design World by selecting it from Spares:
Case 1 - Inserting a Spare Rack
 Click on "Create Equipment" button in Design World toolbarPlace Equipment dialog opens displaying Equipment C&T tree and Equipment Instance grid.
|
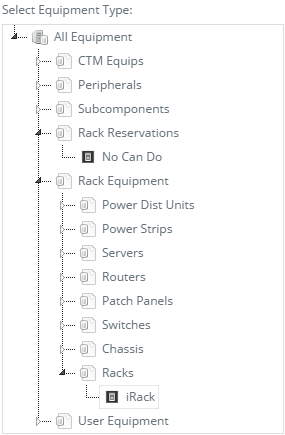
 Select Rack Instance Click on an Equipment Type under the Racks category in the Equipment C&T tree.
Step 2 causes the Equipment Instance grid to list all available Equipment instances, in this case a Rack, for the selected Equipment Type. Click on a row entry in the Equipment Instance grid. The Place button is located in the bottom right corner of the dialog and is enabled once the Equipment instance is selected from the grid. Clicking on it closes the dialog and displays the newly created Rack in the Design World.
|
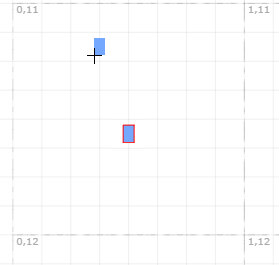
 Position the created Rack in Design WorldOnce created, the new Rack is attached to the crosshair cursor and can be moved around in the Design World. Single left click on the desired location places the Rack and selects the Rack in the Design World.
|
Case 2 - Inserting a New Rack
The steps below describe an alternative use case scenario where a new Rack instance is created, rather then used the existing one from Spares. Some steps from the previous scenario are repeated, but not in the same order.
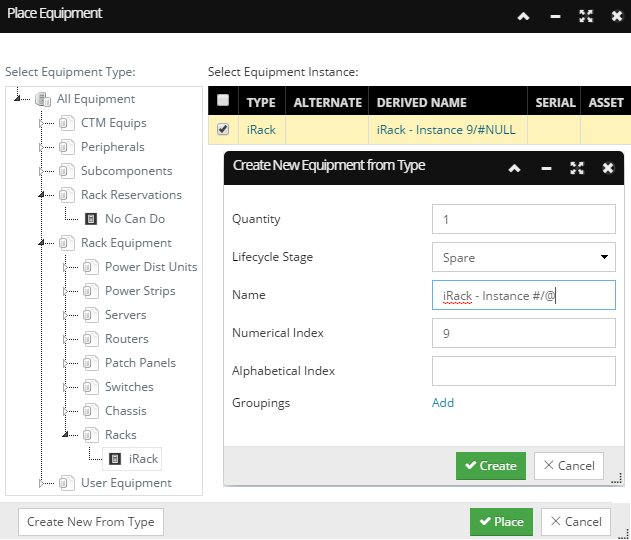
 Click "Create Equipment" button in Design World toolbarPlace Equipment dialog opens displaying an Equipment C&T tree and an Equipment Instance grid.
|
 Select Rack Equipment TypeClick on an Equipment Type under the Racks category in the Equipment C&T tree. This enables the Create New From Type button.
|
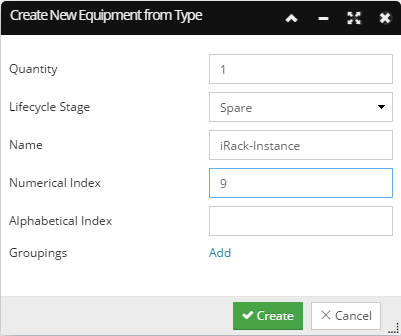
 Create new Rack instances Click on the Create New From Type button located under the Equipment C&T tree. This opens the Create New Equipment From Type subdialog, which allows you to create one or more Rack instances.
|
 Set parameters for creating one or more new Rack instances
This sub-dialog displays several fields that allow the batch creation of Rack instances:
|
Quantity
|
sets the number of the new Rack instances to be created
|
|
Lifecycle Stage
|
sets the Lifecycle Stage of the newly created instance(s) to one of the predefined values
|
|
Name
|
name format, any set of alphanumeric characters, where any sequence of the # symbol gets replaced by the current numeric index value, and @ is replaced by the current alphabetic index value
|
|
Numerical Index
|
initial value for a numeric value that is auto-incremented when creating multiple Equipment instances; the numeric value replaces any contiguous sequence of # in the name format value
|
|
Alphabetical Index
|
similar to Numerical Index, but in base 26 using letters A-Z or a-z only
|
|
Groupings
|
clicking on the Add hyperlink opens the Set Groupings sub-dialog displaying multi-select checkbox list of IRM Groupings
|
|
 Click the 'Create' buttonThis causes the new instances specified by the sub-dialog fields to be created and shown in the main dialog.
|
 Select Rack InstanceThe Equipment Instance grid lists all available Equipment instances for the selected Equipment Type. Click on the checkbox of a row entry in the Equipment Instance grid. Be aware that it is also possible to select multiple Rack instances, enabling the multiple placement feature as described in Creating Equipment in the Design World. |
 Click on "Place" buttonThe button is located in the bottom right corner of the dialog and is enabled once the Equipment instance is selected from the grid. Clicking on it closes the dialog and displays the newly created Rack in the Design World.
|
 Position the created Rack in Design WorldOnce created, the new Rack is attached to the cross cursor and can be moved around in Design World.
A single left click on the desired location places and selects the Rack in the Design World:
|