Labels are small text items used to display information associated with objects in the Design World. They can be created for the following Design World objects:
Equipment
Cables
Pathways
Maintenance Holes
Locations
Spaces
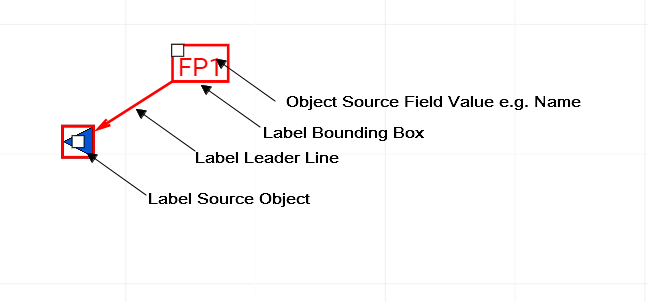
The following screenshot shows the components of a Label.
A Label is created by selecting one or more objects in the Design World and selecting Create Label from the associated context menu. A centralized place for managing Label content is the Label Properties dialog, which is accessed through the Label object's context menu for the selected Label object in the Design World.
The following text and screenshot images cover a general use case scenario of creating and editing a Label for an Equipment object. The process is similar for all previously-mentioned Design World object types.
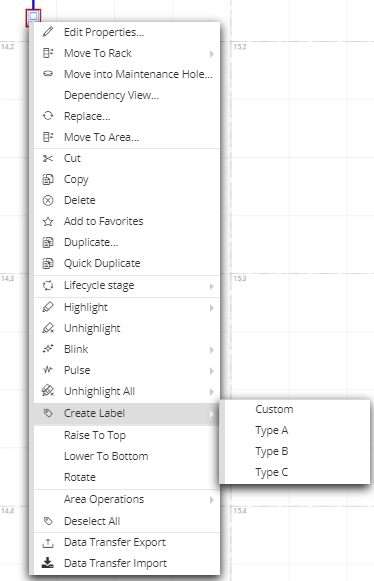
Select the Create Label option from the object's context menu
Right-click on the selected Design World object and select the Create Label option, which shows several additional options for Label creation:
Custom and
Type A
Type B
Type C
A Custom label is used to define a label that display set fields from the Object whereas Type A , Type B and Type C are dynamic labels which can be altered using a Label Set templates defined in the Label Set Manager dialog. For more details about the Label Set Manager dialog, see the last point below (Point 7).
Selecting any of these options closes the context menu and displays the newly created Label object.
TIP: Default Label Fields and Default Label layers for each object is set in the User Settings dialog. Also, User Defined Label layers can be defined within the Layer Manager.
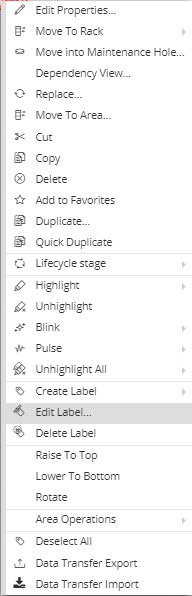
Select Edit Label option from Label's context menu
Single left-clicking the Design World object selects both the object and its Label, while another (right button) click on the Label opens the object's context menu with additional options for the Label object itself - Edit Label... and Delete Label. Selecting the Edit Label... option closes the context menu and opens the Label Properties dialog, explained in more detail in the following steps.
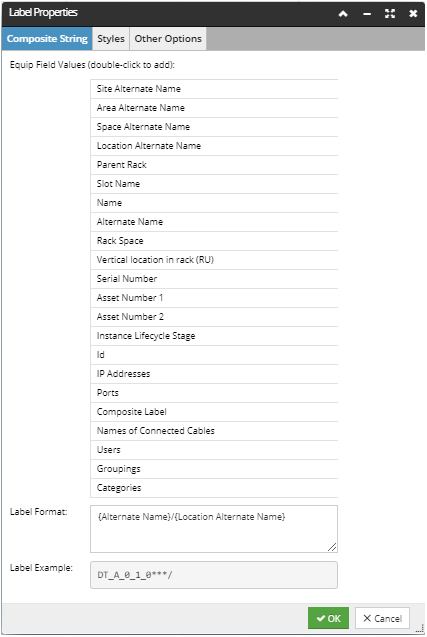
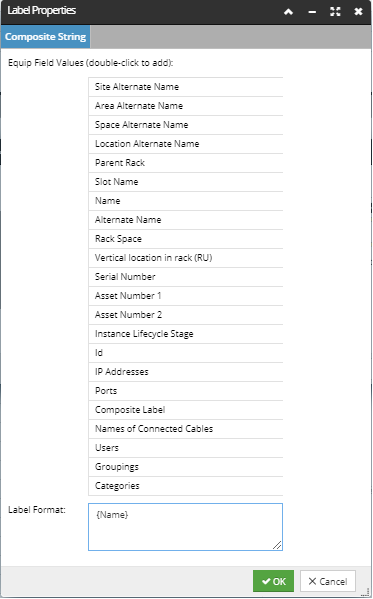
Edit Composite String properties in the Label Properties dialog
The Composite String tab displays a list of some of the object's (instance) fields, the label format and a preview field. Double-clicking on any of the fields from the Equipment Field Value list adds a field placeholder (the field name in { }) in the Label Format field. Multiple field placeholders and other text can be added to Label Format. The content of Label Format controls what is displayed in the label string in the Design World for this object -- the field placeholders are replaced by the actual values of those fields for the object, while other characters are left as they are in the Label Format. An example of the final label display string is shown in the Label Example field, as changes are made to the format. Finally, clicking on the OK button will apply the current Label Format to he select Label entry.
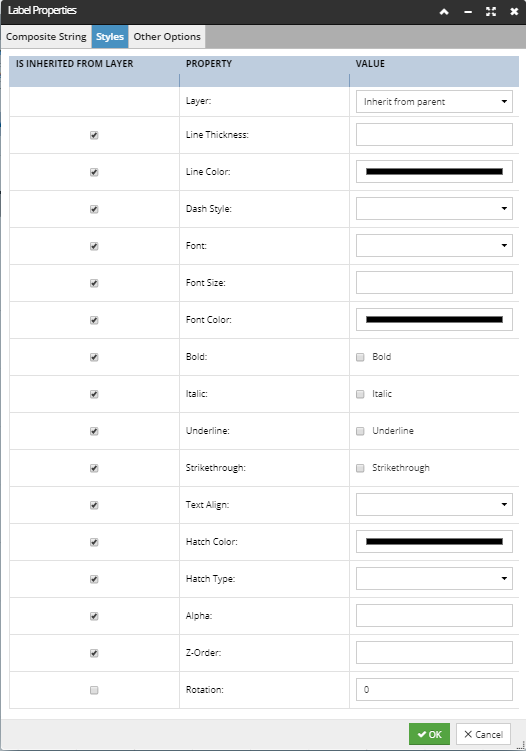
Edit Style properties in the Label Properties dialog
The Styles tab displays multiple style properties with the option to edit. All properties can be set to be inherited from the Layer of the Label's parent object - this can be done by clicking on the checkbox next to the appropriate property. The screenshot above shows an example of some properties being changed. If the property is changed, the checkbox is automatically unchecked.
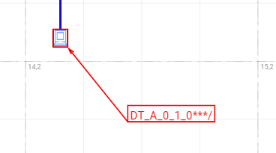
Selecting the Create Label option closes the context menu and displays the newly created Label object, which is automatically locked to the mouse cursor and displayed as a rectangle containing a text label, also attached to an arrow pointing to the parent Design World object (assuming the Draw Arrow option is set).
This state enables the user to move the newly created Label around in the Design World before setting its final position by a single left click:
Prior to positioning the Label object the actual label text doesn't display in its full form, but rather in the same preview mode as in the Composite String tab in the Label Editor dialog (see step 4 for more details about Composite Strings). Once the Label is positioned into its chosen location by the single left mouse click, the Label text is then displayed in its fully loaded form.
Note: The created Label inherits drawing styles from the layer settings for the label specific in User Settings and can be changed on a per label basis after creation by Editing the Label properties (see step 5)
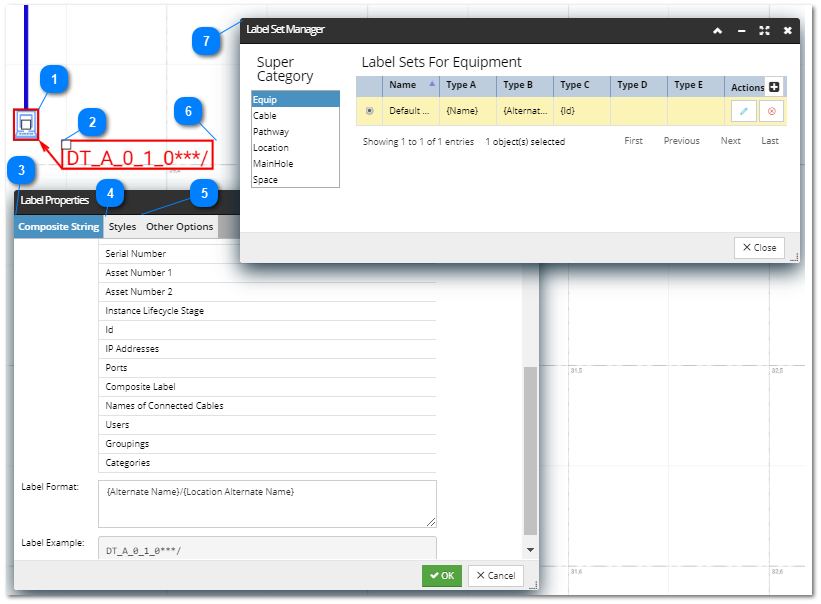
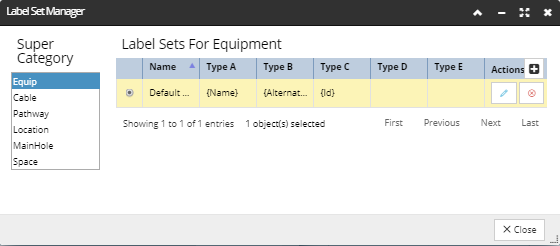
The Label Set Manager dialog allows the user to manipulate Label Sets. Each Label can either be "fixed" in that it its template is stored in the Label itself (as described in Step 3 above), or "dynamic" where it gets its template from whichever Label Set the user has made active for the relevant Super Category. Each Label Set has template values for one or more of the dynamic label classes (Type A, Type B, etc. in the screen shot above). In this way, the Label Set can provide template strings for any number of Labels. Label Sets are useful if you want to be able to dynamically change the templates of all the Labels for a Super Category.
The dialog is similar to Filter Manager, containing 2 major areas:
vertical tabs with Super Categories
a main grid showing the available Label Sets for the selected Super Category.
Additionally, this dialog enables adding, editing and removing Label Sets, all with standard grid action buttons. Clicking on the pencil/edit, or on the + action button opens a small pop-out Label Set dialog, which enables editing the Label Set name and specifying several Label Set Types, or templates, which are pre-defined Composite String Label specifications.
This sub-dialog also enables specifying new and editing existing Label Set Types. Clicking on either the pencil/edit or on the + icon opens the Label Properties dialog, displaying only the Composite String tab, which enables editing the Label's text.