Replacing Slotted Equipment
This topic explains the options for handling component cards and modules when replacing Equipment that has subcomponent Equipment installed in its Slots.
The default is to replacet Equipment subcomponents and move the replaced Equipment subcomponents to Spares. However, this may require a lot of work to make the state of the replacement Equipment similar to the original Equipment, such as configuring the right cards/modules in and plugging Cables back into those cards/modules.
In order to automate this process and ease the user experience, IRM provides additional options for managing slotted Equipment during the replacement operation.
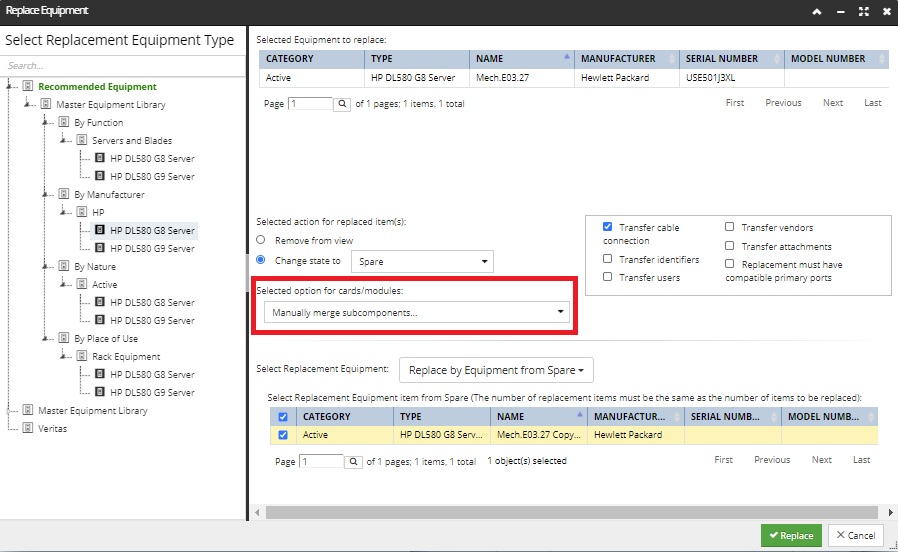
On the right side of the Replace Equipment dialog, a drop-down menu contains multiple options specifically for handling the installed cards/modules:
The following is a description of each option:
Use replacement subcomponents only - the default mode described at the beginning, this option uses any cards/modules in the replacement Equipment and moves any cards/modules in the replaced Equipment to Spares. This is the simplest and most straightforward way to perform the Equipment replacement operation itself, since it doesn't require managing the subcomponents of replaced Equipment, or replacement Equipment, for that matter. This often is an inexact operation and works on a best-case basis. One needs to take into consideration that the two Equipment instances could have a different number or a type of Slots specified for its Equipment Type. The downside of this approach is that the replaced Equipment may require additional editing of subcomponents after the replacement operation, via the Equipment Properties dialog.
Keep original subcomponents – this option removes any subcomponents from the replacement Equipment and transfers the original subcomponents into the replacement Equipment. The transfer depends on the replacement Equipment having compatible Slots, but in the case of choosing a Recommended Equipment object, the transfer should be successful. This approach has the benefit of preserving the original subcomponents and connections, where possible, but may not reflect how Equipment replacement is conducted in practice, which often involves using all new subcomponents (as in the first option).
Merge subcomponents, preferring original subcomponents – keep all of the original subcomponents and remove the replacement (new) subcomponents that occupy Slots needed by original subcomponents. This approach is similar to the previous one, but adds the replacement components to any open slots.
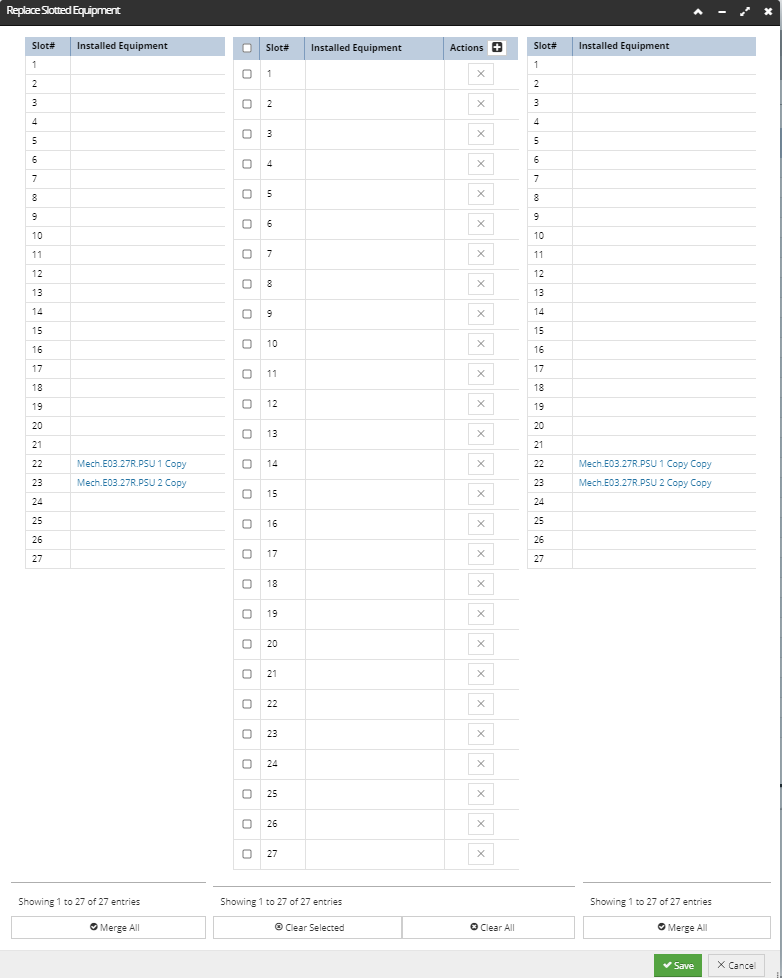
Manually merge subcomponents... – this option gives the user complete control of which subcomponent is used in each slot and is therefore the most flexible and in many situations the most useful. It opens a new sub-dialog, showing full list of subcomponents for the original Equipment (left-side list) and for replacement Equipment (right-side list), plus the third "resulting" list (middle list) that can be manually specified using the other two lists. Below is a screenshot example of such dialog for a case of replacing an Equipment with a duplicated Equipment item that has the same subcomponent configuration:
Notice the left-side and the right-side lists show the same columns, while the middle (resulting) subcomponents list contains additional Action buttons for removing and adding subcomponents.
For the resulting, or the "destination" list of subcomponents, user can proceed with the following options:
-
use the original subcomponent (if any), by click on the
Merge All button on the bottom left
-
use the replacement subcomponent (if any), by click on the
Merge All button on the bottom right
-
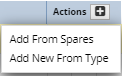
add a new subcomponent, by clicking on the
+ action button in the middle grid, which brings up the standard
Add from Spares /
Add New From Type drop-down menu (screenshot below). Selecting either of these options will bring up the standard Add Equipment dialog, after which the selected subcomponent Equipment is added to the Slot position.
-
remove individual subcomponents from the destination list by clicking on the
x button next to the Slot position that needs to be removed. Selecting the Slot position by clicking on the checkbox next to it enables the
x button.
Additional Clear Selected and Clear All buttons at the bottom enable an alternative way for removing several subcomponent Equipment objects from Slot positions:
-
Clear Selected button requires a Slot to be selected (via the checkbox) to be enabled
-
Clear All button simply removes all subcomponents from the resulting (middle) Equipment.