Below screenshots are from the Equipment Type context menu in the Object Grid and Design World.
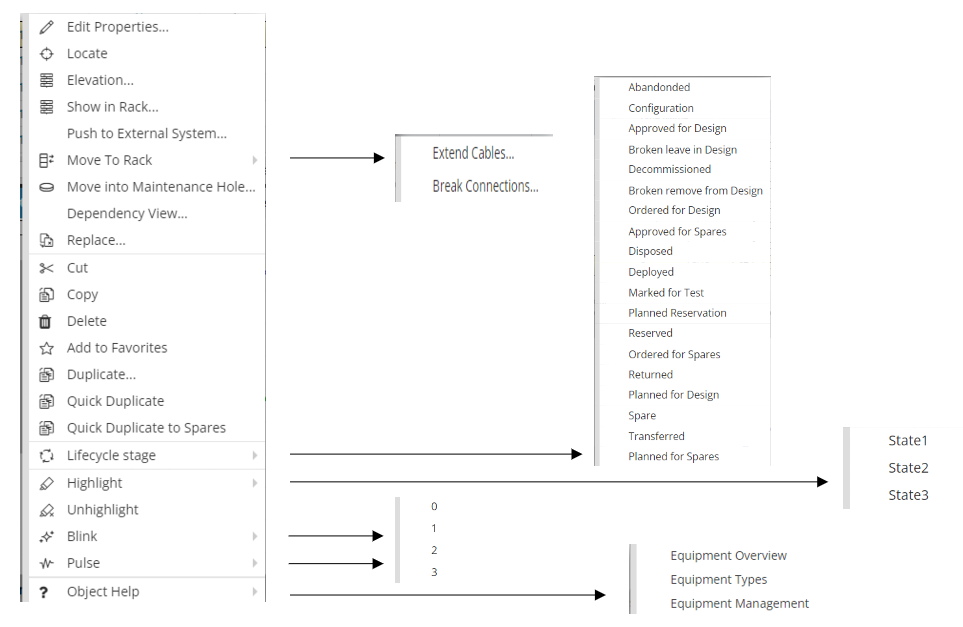
Object Grid
Object Grid Equipment Context menu.
Edit Properties: Opens the Object's Editor Dialog.
Locate: Shows the Equipment Object in the Design World.
Elevation: Opens the Elevation dialog for the selected Equipment to edit, add or remove equipment in the Rack or other Equipment that allows contained Equipment
Show in Rack: Opens the Elevation dialog and shows the active Equipment in rack.
Push to External System: Opens the Push to External System dialog so you can transfer IRM objects to select external systems.
Move to Rack: Opens the Move to Rack dialog to move the selected Equipment.
Extend Cables: Extends cables from the old location of the active Equipment to the location of the Rack.
Break connections: Break Cable connections from active Equipment
Move into Maintenance Hole: Opens the Select Object dialog to choose the Maintenance Hole, then moves the Equipment into the chosen Hole.
Dependency View: Opens the Dependency View dialog to present all dependencies of the Equipment.
Replace: Opens the Replace Equipment dialog for replacing an Equipment object.
Cut: Copy the Equipment to the clipboard and remove it from the Design World.
Copy: Copy the selected Equipment to the clipboard.
Delete: Delete the Equipment.
Add to Favorites: Add the Equipment in the Favorites list in the Quick View.
Duplicate: Opens the Duplicate Equipment dialog where you can set the quantity, name and more info and initiate the duplication process.
Quick Duplicate: Make a quick duplicate in the Object Grid.
Quick Duplicate to Spares: Copy the selected Equipment to spares.
Life Cycle Stage: Where you can choose a specific stage for the selected Equipment.
Highlight: Put the selected Equipment in one of 3 highlight states.
Unhighlight: Unhighlight the selected Equipment.
Blink: Blink the selected Equipment (alternately show and hide it)
Pulse: The object gradually gets brighter then gradually gets duller, at the specified rate.
0: 0 s
1: 1 s
2: 2 s
3: 3 s
Object Help: Opens the documentation and direct you to Equipment overview, Equipment Types and Equipment Management sections.
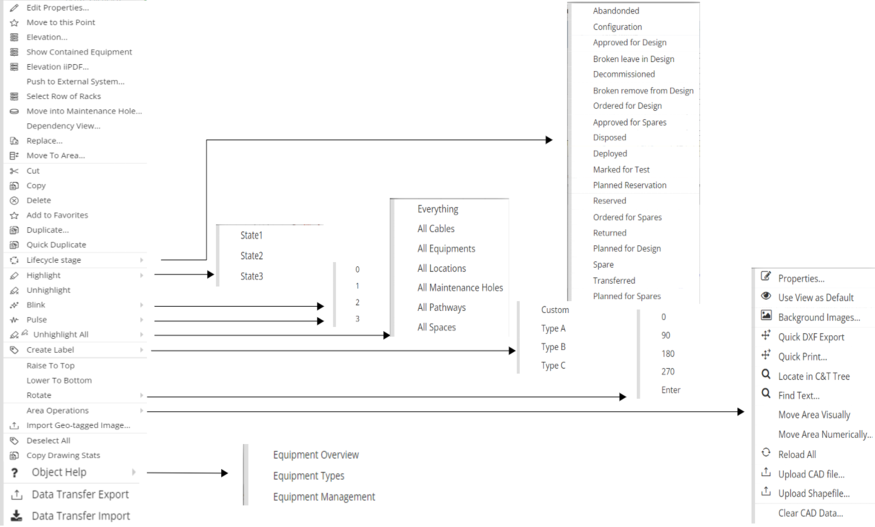
Design World
Design World Equipment Context menu.
Edit Properties: Opens the Object's Editor Dialog
Move to this point: When you select the Equipment and right click on the desired point to move the Equipment to it.
Elevation: Opens the Elevation dialog for the selected Equipment to edit, add or remove equipment in the Rack or other Equipment that allows contained Equipment
Show Contained Equipment: Show all the contained Equipment, in the Object Grid.
Push to External System: Opens the Push to External System dialog so you can transfer IRM objects to select external systems.
Select Row of Racks: Highlight a row of racks vertically or horizontally.
Move into Maintenance Hole: Opens the Select Object dialog to choose the Maintenance Hole.
Dependency View: Opens the Dependency View dialog to present all dependencies of the selected Equipment.
Replace: Opens the Replace Equipment dialog for replacing your active Equipment.
Move to Area: Opens a list of Areas that you can move the selected Equipment object to.
Cut: Copy the Equipment to the clipboard and remove it from the Design World.
Copy: Copy the selected Equipment to the clipboard.
Delete: Delete the Equipment.
Add to Favorites: Add the Area in the Favorites list in the Quick View.
Duplicate: Opens the Duplicate Equipment dialog where you can set the quantity, name and more info and initiate the duplication process.
Quick Duplicate: Make a quick duplicate in the Design World.
Life Cycle Stage: Where you can choose a specific stage for the selected Equipment.
Highlight: Put the selected Equipment in one of 3 highlight states.
Unhighlight: Unhighlight the selected Equipment.
Blink: Blink the selected Equipment (alternately show and hide it)
Pulse: The object gradually gets brighter then gradually gets duller, at the specified rate.
0: 0 s
1: 1 s
2: 2 s
3: 3 s
Unhighlight All: Provides option to Unhighlight specific objects in the active Area.
Everything: Unhighlight all highlighted objects in the active Area.
All Cables: Unhighlight all highlighted cables in the active Area.
All Equipments: Unhighlight all highlighted Equipment in the active Area.
All Locations: Unhighlight all highlighted Locations in the active Area.
All Maintenance Holes: Unhighlight all highlighted Maintenance Holes in the active Area.
All Pathways: Unhighlight all highlighted Pathways in the active Area.
Create Label: Create a label for the selected Equipment.
Raise to Top: Raise the Equipment to the top, when there are multiple items stacked over each other.
Lower to Bottom: Lower the Equipment to the bottom, when there are multiple items stacked over each other.
Rotate: Rotate the Equipment to 90, 180, 270 or enter the desired angle.
Area Operations:
Properties: Open the Area Properties dialog.
Use View as Default: Saves the current view as the default view every time you open this particular area.
Background Images: Open the Area Properties dialog Background Images tab.
Quick DXF Export: A .zip file with the resulting .dxf output file appears in the browser for download and you will receive an email notification when the file is ready.
Quick Print: Opens the Quick Area Export dialog for printing.
Locate in C&T Tree: Locate the Area in the Categories and Types Tree.
Find Text: Opens the Find Text Instances dialog to search for the required text.
Move Area Visually: Gives you the ability to drag your area in all directions within the Design World boundaries.
Move Area Numerically: Opens the Move Area dialog where you can insert your desired coordinates to place your Area.
Reload All: Reloads all currently-visible data in the Area.
Upload CAD File: Opens the Import CAD File dialog, where you can upload your CAD file.
Upload Shapfile: Opens the Import Shapefile dialog, where you can upload your Shape file.
Clear CAD Data: Clear CAD data for the whole Area. Does not delete Equipment, Cables and other IRM Managed Objects.
Import Geo-Tagged Image: Opens the Geo-Image Import dialog to upload your image.
Deselect All: Deselects all the selected objects in your Area.
Copy Drawing Stats: Copies your drawing stats and you can paste it as a JSON file in a text editor.
Object Help: Opens the documentation and direct you to Equipment overview, Equipment Types and Equipment Management sections.
Data Transfer Export: Opens the Data Transfer Export dialog to start the download. Inside the dialog, you'll find options that let you customize your download preferences.
Data Transfer Import: Allows you to import that was created via Data Transfer Export.
Note that when multiple objects are selected, not all of the above options will be available, and the exact set of options depends on whether all objects are in the same Super Category, same Area, etc.