Spreadsheet import, also known as DDR (Dynamic Data Reconciliation) Import, is used to bulk-load information from external data sources such as spreadsheets files and other database systems into IRM. This feature can be used to both create and update objects in IRM.
Spreadsheet import is done via a basic 4-step process (with additional steps between step 3 and 4 enabled for some object types, as explained later in the use case example):
Source data - A spreadsheet is uploaded by the user for the appropriate Object Category
Import parameters - Specifying how the data from the CSV records is matched against existing objects and whether new objects are created from the CSV data, or existing objects are overwritten by matching CSV objects.
Data preview - The sample data is presented to the user and if the user is satisfied, the import data from the previous step is sent to the server, which completes the import operation. As with Filters and other staged objects, the staged import data expires after some time (like a few hours or 1 day), or expires immediately if the same user engages in a new Spreadsheet import operation.
The following IRM object types can be imported via CSV import:
Equipment
Space
Cables
Software
Circuits
Pathways
Locations
Maintenance Holes
Areas
Contacts
Users
Vendors
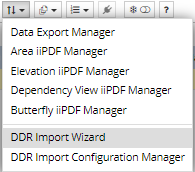
Note that these are all "instance" objects -- Types and Categories cannot be imported via DDR. The DDR Import feature is represented as a multi-step wizard dialog, accessible from the Main Screen, by clicking on arrow icon, which opens a drop-down menu with the following options:
Selecting the DDR Import Wizard option opens a new dialog, which is explained in detail in the following text and screenshot images through a step-by-step scenario.
Note that in this topic, the focus is to explain the features of this operation that are common for all object types, while additional specific features enabled only for certain types of objects will be described in separate use cases as sub-topics.
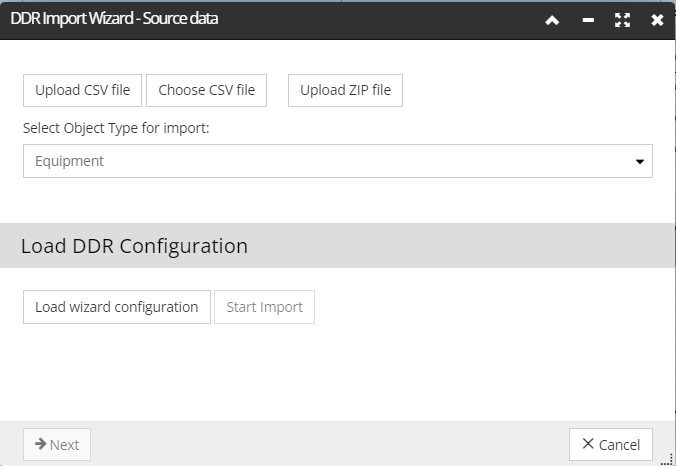
Step 1: Select source data
The DDR Import Wizard - Import parameters & source data dialog is the first screen displayed in the DDR Wizard Interface, as seen below:
This dialog enables specifying the format and location of the data source. To show the most common features of this dialog for all types of objects (as mentioned earlier), we will show an example of importing .csv Pathway object data in order to update the existing Pathway object inventory. The screenshot(s) and the text below explain all steps of that operation in more details.
In this example UploadCSV file is selected, as we will upload a spreadsheet from a local directory..
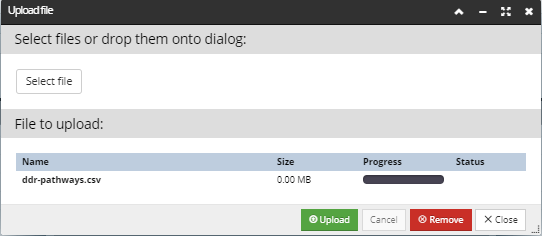
To select and upload the desired Spreadsheet file click on the Upload CSV file button,
which opens the Upload file dialog:
Click on the Select file button, which opens the standard browser file upload dialog. After selecting the file, its name is displayed in the File to upload grid, along with its size, status and an additional action button for removing. Click on the Upload button animates the Progress bar, indicating the progress of the file upload, closes the dialog and brings focus back to the DDR Wizard dialog.
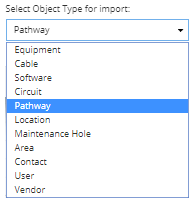
Specify the destination IRM Super Category to migrate the data into by selecting the object type associated with the data source by clicking on the Select Object Type for import drop-down menu:
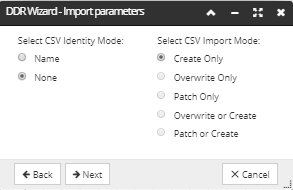
Click on the Next button updates the dialog to the next step of the DDR Import Wizard - Import Parameters -
Specify the CSV Identity Mode and the CSV Identity Mode by clicking on one of the radio buttons:
Setting the CSV Identity value specifies how the data from the CSV records is matched against existing IRM objects.The following identity modes are supported:
Identity Mode
Description
Name
The CSV data must have a column mapped to the IRM name field. If not, the server returns an error. All Import Mode values are possible.
None
This means there is no attempt to match the CSV records against existing IRM objects. The only valid Import Mode is Create Only
Setting the CSV Import value specifies whether new objects are created from the CSV data or existing IRM objects are overwritten by matching CSV objects. The following import modes are supported:
Import Mode
Description
Create Only
If Identity Mode is None, the server creates a new IRM object for every CSV record. Otherwise, the Identity Mode and corresponding column data are used for each row to determine whether there is a matching IRM object. If there is, the CSV record is ignored, otherwise a new IRM object is created.
Overwrite Only
If the server can find a matching IRM object by using the Identity Mode and corresponding column data for each row, it updates all of the object, using whatever mapped fields are available from the CSV data, and default values for the rest of the fields. Otherwise, the CSV row is ignored.
Patch Only
If the server can find a matching IRM object by using the Identity Mode and corresponding column data for each row, it updates that object from the CSV data with any mapped fields and other fields are left unchanged. Otherwise, the CSV row is ignored.
Overwrite or Create
If the server can find a matching IRM object by using the Identity Mode and corresponding column data for each row, it updates all of the object, using whatever mapped fields are available from the CSV data, and default values for the rest. Otherwise, it creates a new object from the CSV data.
Patch or Create
If the server can find a matching IRM object by using the Identity Mode and corresponding column data for each row, it updates that object from the CSV data with any mapped fields. Otherwise, it creates a new object from the CSV data.
NOTE: Successful matching is critical in order to do updates of existing objects and to avoid creating duplicated objects.
IMPORTANT: The difference between Overwrite and Patch is that Overwrite updates the entire target object, whereas Patch only updates the fields explicitly supplied in the CSV file. In most cases, the Patch modes are more appropriate.
Click on the Prefer Alternate Name For References checkbox to set the lookup of Reference objects by their Alternate Name field (if they have one) in case a name is used in the CSV data:
For reference fields, either single references or lists of references (e.g. Vendors), the CSV data can contain either IDs as small integers or names. Which is used can even vary on a row-by-row basis. If a name is used in the CSV data, the server will look for the matching object by its Name parameter, unless Prefer Alternate Name For References is true and the relevant object type has an Alternate Name field. For example, if this value is true and the server is trying to locate an object to fulfill the Vendors reference, then Alternate Name will be used.
Click on the Next button on the bottom of the dialog to proceed with the next step of the DDR Import wizard:
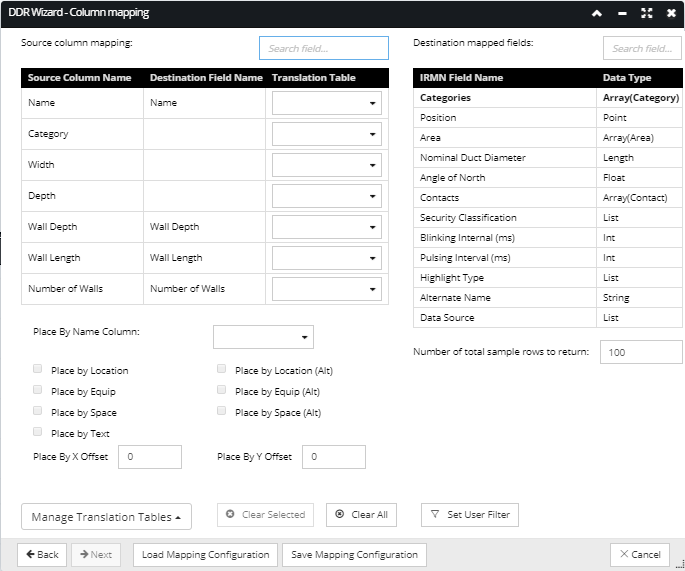
The DDR Import Wizard - Column mapping dialog enables the following functionalities:
listing column data from the source DDR import file.
listing destination columns associated with the selected object super category
setting the Place By object type to use when importing objects to be placed graphically within the Areas design world canvas
using search fields to filter source and destination column lists
managing (view, add and remove) Translation tables used to translate a value in the source data to a valid value contained in the database.
The screenshot(s) and the text below explain all steps in more details:
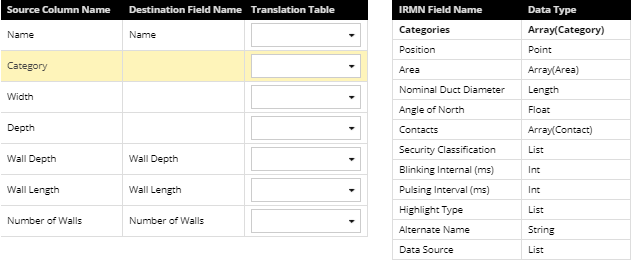
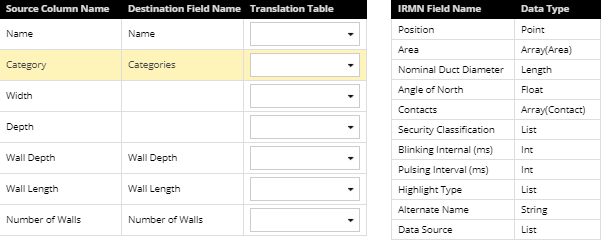
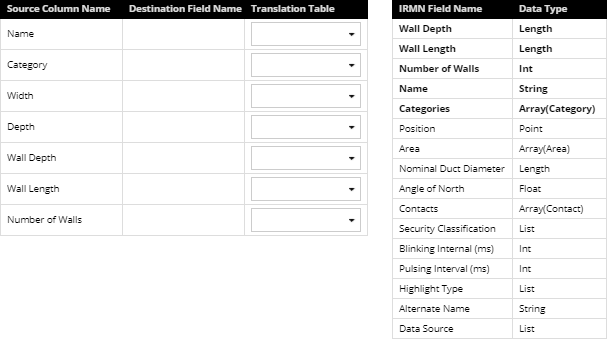
Create mappings from CSV columns to IRM fields by selecting a Source Column Name in the Source grid and then double-clicking on the appropriate row entry in the Destination grid to specify which IRM field the data will be imported to. The screenshots below show that by example; the Category entry is selected in the Source grid and the appropriate Categories entry is double-clicked in the Destination grid:
This moves the Categories field from the Destination to the Source grid under the Destination Field Name column:
The same process can be repeated for each row entry from the Source grid where a mapping from the imported to the existing IRM field is needed.
If a CSV column is not mapped, it is ignored during the import. One very important convenience feature of this dialog is the auto-map feature that matches CSV columns to IRM fields if both have identical names, as displayed in the screenshots above.
If the IRM user controls the creation of the CSV files being used, or has the opportunity to modify the CSV files before they are imported, it is a best practice to name the columns the exact same way that IRM fields are named and to use the auto-map feature. Doing so greatly speeds up the field mapping process and reduces the risk of incorrect mappings being made.
If your source data does not have column names that can be auto-mapped but its format will be imported multiple times then, the next best approach is to save the mapping configuration. This will allow the mapping to be saved and restored during each import and avoids having to map the data manually.
Holding the Shift key enables selecting multiple consecutive rows, while holding the Ctrl key enables selecting multiple individual rows. Each selected row from the Source grid can be deselected by another single left mouse click.
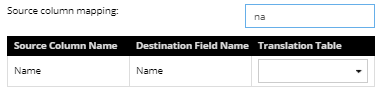
The left Quick Search box enables quick filtering of the list of Source data fields simply by entering a part of the Source Column Name. This narrows the numbers of rows in the Source column grid and displays only row entries that match the specified string:
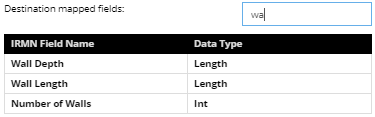
The right Quick Search box provides a similar function for the destination field list:
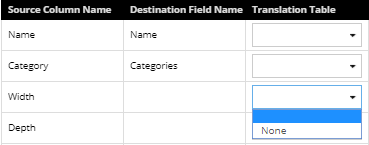
An additional column in the Source grid enables the IRM user to apply a specific Translation table to the import. Click on a row under Translation table column to open a drop-down menu with the list of Translation tables specified for the selected Object Type and None as an option for an empty Translation table:
Translation tables are used to apply search and replace strings to the source data prior to importing into IRM. The translation table is a group of simple find-replace pairs that are applied to the data in the specified column and thereby allows the data to be dynamically modified during the import without the user having to modify the data in the original data source, which can be convenient if the source data is generated in some way that cannot be easily altered. The same Translation Table can be used against more than one column and some columns many not have a Translation Table assigned. In addition to selecting a Translation table for a specified source column, this dialog also enables managing Translation tables (see step 4).
The number of total sample rows to return in the next (data preview) step in the DDR Import Wizard can be set in the appropriate numeric text field under the Destination grid:
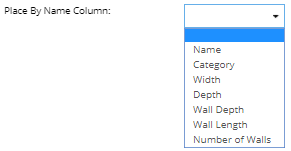
If an object is to be placed into the Areas Design World canvas, then the Specify the Place by Name Column must be set by clicking on the Place by Name Column drop down menu and selecting one of the source data columns to use for placing the object into the Areas Canvas.
This value is the name of the column in the CSV data which contains the "Place By” values. A Place By value is the name of some object that a newly created object will be placed close to in the Design World. The Place By flags described in the next step specify which types of objects the application should try to match the Place By value with.
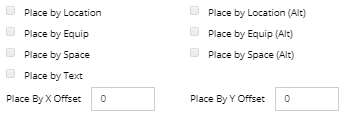
Specify the type(s) of objects which should be searched for the Place By data by clicking on the appropriate checkbox(es):
These flags indicate which kinds of object names a Place By value might represent. For example, if the Place By Location and Place By Space (Alt) checkboxes are selected and a CSV row with a Place By value of “B2F1 100” is being processed, the server will look for a Location object with the name “B2F1 100” and if it can’t find it, it will look for a Space object with the same name. Note: that if more than one checkbox is selected, the application searches in the order they are listed in the screenshot above.
The Place By X / Y Offset numeric fields enable specifying the offset of the position of the newly created object relative to the existing object. The entered values can be either simple numbers, in which case inches or cm are assumed to be the units, or a number followed by "U" or "u", in which case the units are rack units.
Click on the additional helper buttons if an existing mapping needs to be cleared, or additional filtering of the data is needed:
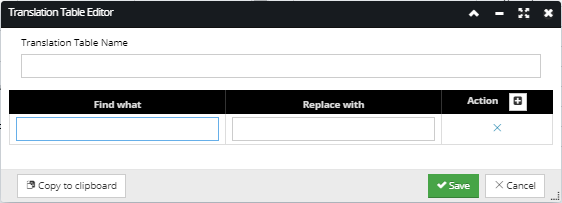
Click on the Manage Translation Tables button opens a drop-down menu with the list of existing Translation tables specified for the selected Object Type and the Add New Translation table option:
Selecting one of the existing Translation Tables opens the Translation Table Editor for that particular entry, while selecting the Add New Translation Table option opens a blank Translation Table Editor:
The dialog contains a text field for specifying the Translation Table Name and a grid listing simple sets of Find what- Replace with pairs that are applied to the data in the specified column. Clicking on the + Action button creates an empty row entry in the grid, while clicking on the x Action button deletes it. The find-replace text strings are entered simply by clicking on the appropriate text box in the grid. When creating / editing is completed, click on the Save button to stored changes made for the new/selected Translation Table, or Cancel button to discard them.
The Clear Selected and Clear All buttons enable clearing selected or all mappings from the Source grid:
For example, if the Clear All button is clicked, all mapped fields would move from the Destination Field Names column in the Source grid back to the IRM Field Name column in the Destination grid, as displayed in the screenshot below:
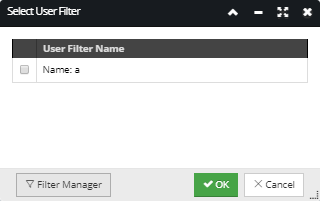
The Set User Filter button - opens an additional Select User Filter pop-out dialog displaying all User Filters currently applied to the appropriate tab in the Object Grid. Click on the checkbox next to the appropriate User Filter Name row entry and the OK button at the bottom of the dialog will apply the User Filter to the result data. Also, additional filters can be created / applied using the Filter Manager, which can be directly accessed by clicking on the Filter Manager button at the bottom of the dialog:
DDR Import enables checking for duplicated values for several types of fields, all checked by default. During that check, if a DDR import encounters an object with the same name in a context where it is creating a new object, in the last step of the Import (Data Preview) a warning is displayed for the appropriate row as the "Duplicate object" yellow text in the Import result column. Even though a warning is indicated, the object can still be imported.
Click on the Next button on the bottom of the dialog to proceed with the next step of the DDR Import wizard -
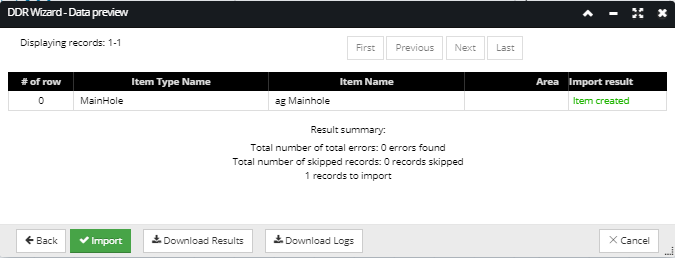
This screen is the last step of the DDR Wizard interface. It displays the result data of the configured CSV Import listed in a data grid, along with additional properties and action buttons:
The resulting data grid contains an entry for each CSV row (excluding the header row, of course), up to the maximum indicated by the number of total sample rows to return, specified in the previous wizard step. Additionally, the result data grid also contains entries corresponding to any rows beyond the specified number of total sample rows to return that generate an error a or warning (result of No match, Missing Type, or Invalid data), up to an additional number of total sample rows to return items.
For example, if the specified number of total sample rows to return is 10 and there are 50 rows with errors / warnings, but only 3 of the first 10 rows have errors, the server returns 20 rows, including rows 1-10 plus the next 10 rows that have errors or warnings. For easier browsing through the Result records, additional pagination buttons are located on the top of the dialog.
Note: If DDR import encounters an object with the same name in a context where it is creating a new object, it marks that row with a yellow text "Duplicate object" Import Result, which is a warning.
To download the results or logs in a text file, click on the Download Results or the Download Logs button(s). To finish the DDR Import operation, click on the Import button, which closes the DDR Wizard dialog.
Important: When a power cable is connected to a power consumer, it may cause the Port at the other end of the Cable to become overloaded, or any further upstream Ports or Equip objects to become overloaded. Similarly, if a power Cable is connected to a power supplier (PDU, power strip, breaker, etc.), the Equip at the other end of the Cable may draw enough Power to overload the Port, the Equip, or something upstream. The user is normally warned about these potential power overloads via a dialog that pops up. For more information about the warnings, click on the following topic - Power management. However, in case of the DDR Import operation, the overload warning is displayed in the last step of the wizard, similarly to how other warnings are displayed, indicating the source of the potential issue with the number of row in the first column.